Locate the menu at the top left of your screen containing ‘markers’, ‘meter’, and ‘tempo’. Look to the right of ‘tempo’; you will see a small red arrow next to a number. Double click this red icon and input a new BPM. Once you click, apply, you will have a new tempo.
Changing The Tempo In Pro Tools
Mastering tempo changes is an essential part of audio production. Opening up new possibilities will enhance creative control, improve your sound, and, crucially, give you more confidence in your tracks.
Maybe you’re working on a new track, but the default tempo is holding you back.
Let’s face it; not every song should be in 120BPM (beats per minute). And if they were, you’d probably want yours to be different anyway.
This guide will explain several ways to create tempo changes in Pro Tools to improve your audio production skills and make your life easier.
This Guide Will Cover
- Changing the Session Tempo
- Tap Tempo
- Creating Tempo Changes
- Creating Tempo Changes (Quick Method)
- Creating Gradual Tempo Changes
What You Need
All you will need for this guide is a computer with Pro-Tools installed.
If you haven’t downloaded this DAW (digital audio workstation) already, you can find the software here.
There is a free version available for new users.
Changing the Session Tempo
This will change the tempo of your entire project.
Step 1
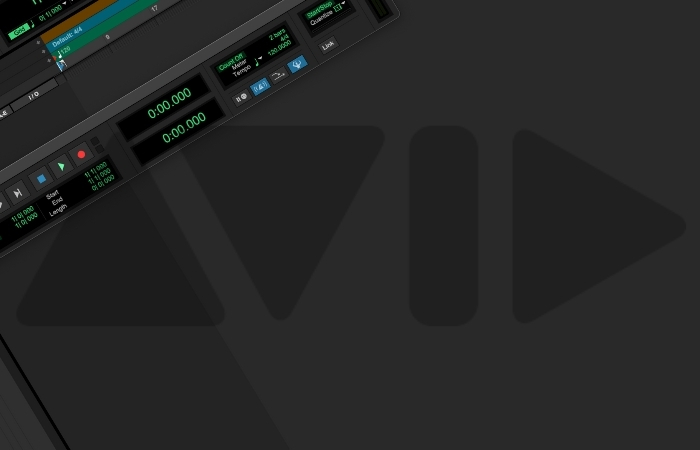
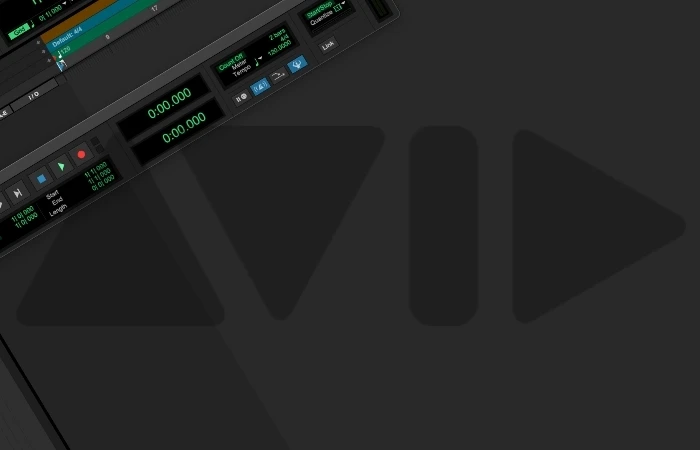
Double click the red icon shown below, and you will see the tempo information.
The number in the green band represents the current tempo.


In the picture, it is 120BPM.
Step 2
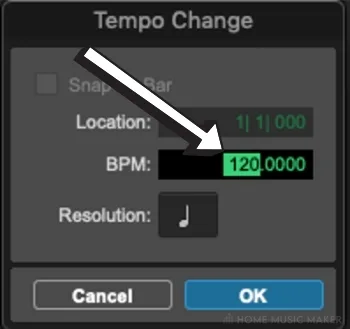
Type in your chosen tempo in the section labeled “BPM.”

Tap Tempo
But what if you still can’t find your ideal tempo?
There is a helpful tool where you can tap your finger on the keyboard in your desired tempo.
Step 1
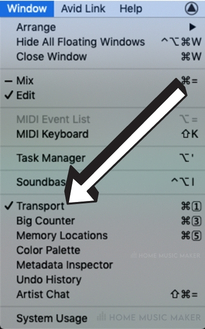
Go to the top menu, click on Window and then Transport as shown below.
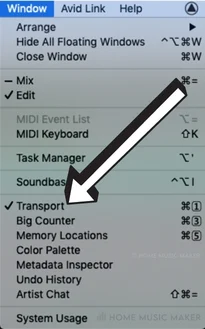
Step 2
Exit Conductor Mode by clicking on the icon on the right with a conductor.


This will take you into Manual Mode.
Step 3
Click on the number shown above the conductor icon and tap the letter ‘T’ on your keyboard.
You should notice that the tempo changes according to the rate at which you depressed the key.


Now you can simply imagine a tempo and easily input it into your DAW.
If you can tap the tempo past the 500BPM limit, your piano teacher will be proud. Or maybe you just spent too long playing Street Fighter!
Creating Tempo Changes
What if you’d like to change a new tempo mid-song?
This is also possible.
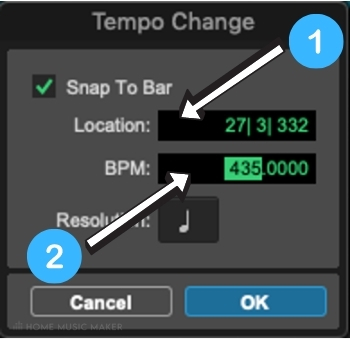
Step 1
Firstly, make sure you are in conductor mode. If you are unsure what that is, you can refer to Tap Tempo, Step 2.
Click on the + icon to the right of ‘Tempo’ in the top left menu.


Step 2
Now you will be able to create a new tempo event.
In the section labeled Location, input the bar at which you’d like the tempo to change. (1) Then input your new tempo in the section labeled ‘‘PM.’ (2)

Creating Tempo Changes (Quick Method)
If you’d like to improve your efficiency, or in a hurry, you could follow this quicker alternative method.
Step 1
Click on the arrow to the left of ‘Tempo‘ that faces right.


This will open a dropdown menu.
Step 2
Activate the pencil tool by clicking on the pencil icon located on the top left.

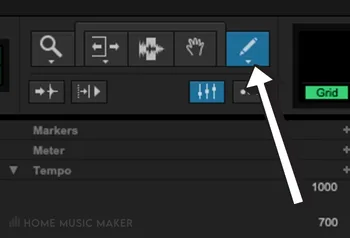
Alternatively, hover the mouse over the green space shown and hold ctrl (or right-click) to use the pencil tool.
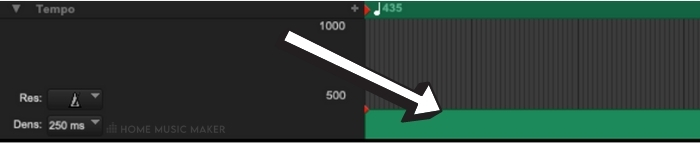

Step 3
Click where you want to include a tempo change in your project, then let go of ctrl (or right-click).

You will now be able to click on the new green section you have created and use the tempo slider to drag your tempo into the desired BPM.
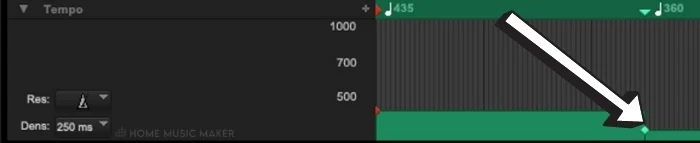
Creating Gradual Tempo Changes
Imagine you want the tempo to reduce slowly at the end of your song.
You wouldn’t want to individually program each tempo change because it would be time-consuming.
Instead, there are easy ways in which you can automate the tempo instantly.
Step 1
You can use the pencil tool to draw your tempo changes exactly how you want them.
Just activate the pencil tool and draw over the green space.

I had some fun here.
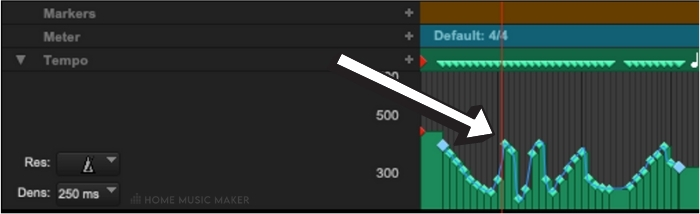
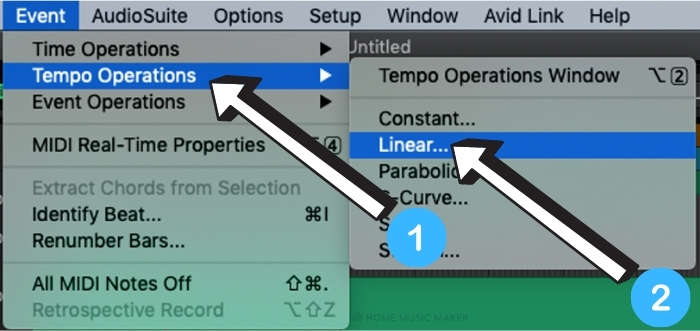
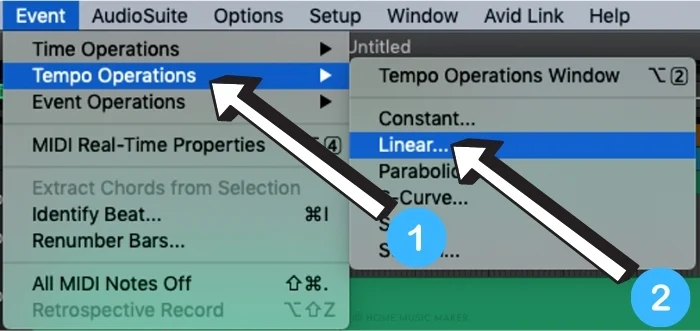
Step 2
However, you might be after something more calculated and precise.
You can create tempo automation with more accuracy by selecting ‘Event‘ in the top menu, then ‘Tempo Operations‘ (1) ‘and then ‘Linear.’ (2)
Step 3
Once you have the ‘Operations‘ menu open, you can input where the tempo change begins (1) and ends (2) and input the change in BPM.


Step 4
Once you have finished, click Apply, and you should have an automated straight line that looks something like this.
Why not explore some of the other automation possibilities, including S-Curve, Scale, and Stretch?
Related Questions
Can pro tools detect tempo?
You can use a plug-in called ‘‘Beat Detective‘ to detect the tempo of an audio track and MIDI notes. The plug-in is included in the paid versions of Avid Pro Tools. There is more information about using this plug-in here.
Where is BPM on Pro-Tools?


This is located in the green band. Here the tempo is 130BPM.
How do you open the transport window in Pro-Tool’?
Go to ‘Window‘ at the top menu. Then select ‘Transport.’
How do you speed up MIDI in Pro-Tools?
When you speed up the tempo, it will automatically speed up the MIDI track in a Pro Tools session.
How do you use time stretch and change the tempo of individual regions?
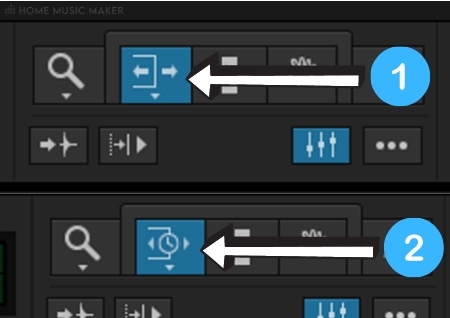

Click and hold on the icon shown below, then select the TCE tool. (1)
It should now look like this. (2)
Now click on the side edges of your audio file and drag to stretch or compress the audio region.
How do you turn off click tracks in Pro-Tools?


Click mute as shown below. This will stop the track from making a sound.
Alternatively, while the track is highlighted, go to ‘Track‘ in the top menu and click ‘delete.’ This will eliminate the track altogether.