The kick drum is an essential part of the mix in most of today’s popular music. Getting it right means mastering the proper EQ response and applying the right amount and type of compression.
In this article, I’ll go over some real-life compression settings and explore how they affect the sound.
You can then try them out, and hopefully, get a step closer to tuning your kick drum compression like a pro!

Basic Compressor Features
Since explaining how the compressor works won’t be the main subject of this article, I’ll go over it briefly. It will be helpful to clarify compression moves we’ll be discussing later on.
Whenever I try to explain the compressor features to people unfamiliar with it, I like to talk about the sound a particular feature produces, rather than getting all technical.
It’s more relatable for mixers and, frankly, not as dull.
Let’s start with the basic one.
Threshold: In some compressors, also named as “Input,” is a setting that determines the amount of compression you apply to a signal. The lower you pull the threshold, the compression effect increases.
Ratio: Generally, higher ratios will produce a more audible compression effect.
Attack: Determines the way a compressor deals with transients. Transients are the initial portion of the waveform. That’s basically where the aggressiveness and punch of any source are found. The faster the attack, the fewer transients you get and vice versa.
Release: Determines the amount of time that the compressor will keep the signal compressed. I found that the faster the release, the more “tail” of the sound you get coming through, and the signal gets more exciting.
Now that we’ve got that out of the way, we can move on to some kick drum compression examples and explore how they affect its sound.
Different Ways To Compress A Kick Drum
Your compression settings will wildly differ depending on the effect you want to achieve and the genre you’re producing.
In different musical situations, you’ll want to bring out other portions of the sound, which I’ll always have in mind when discussing each compressor.
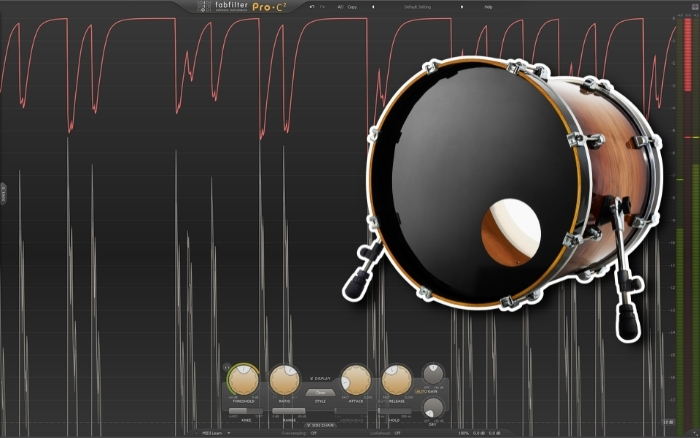
FabFilter Pro C2
I’ve intentionally wanted to kick off with this one since it’s versatile and widely used among all producers.
Many people describe this compressor as the most transparent one and the one that “has no sound.” They mean that it doesn’t introduce a lot of saturation and doesn’t color the sound when pushed a bit hotter.
Although I agree that it’s one of the “cleanest” compressors out there, this doesn’t mean you can’t get some proper dirt out of it!
Here are some of my favorite ways to use this one.
Funny enough, I like using it in Clean Mode to bring out the crunchy attack of the kick.
I use a pretty fast attack (but not the fastest one) to get that satisfying “pop” on my kick drum sound. It increases the attack of the beater and brings the sound closer to the edge of the speaker, which I really like in my rock productions.
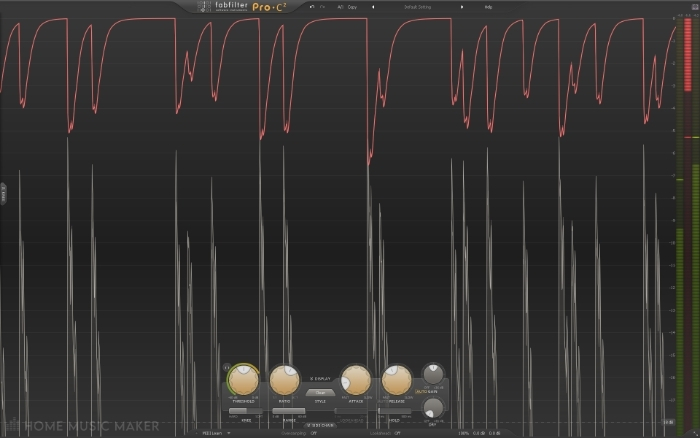

What you want to look out for is the amount of compression you apply.
There comes the point where you can go over the top and actually start losing the low end. It actually happens rather quickly; even at 6 or 7dB of gain reduction, you’ll definitely notice a change in your low-end bloom.
There is a nice trick to get the best of both worlds by using Side Chain Filters.
This allows you to tell the compressor which part of the signal you want to remain untouched by compression. This way, you’ll get the attack you need and that “wet” sound of the compressor without sacrificing the low-end.
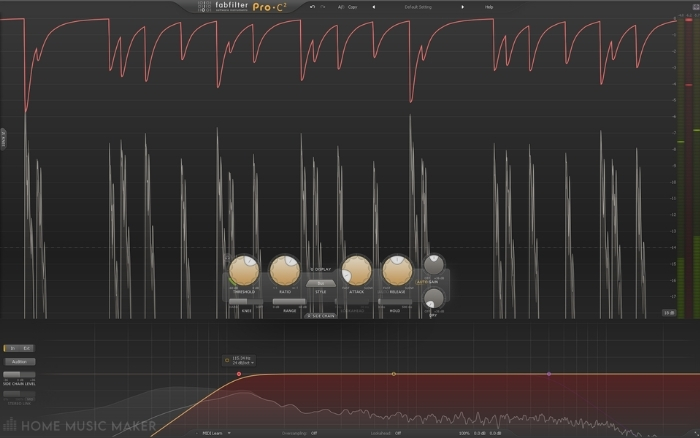

I’ve been using this trick almost by default ever since I came across it.
If you’re looking for a softer bass drum, I’d suggest switching over to Bus Mode.
It’s a really gentle compression that doesn’t color the sound at all. It just tames the dynamics a bit and rounds off the sound.
Honestly, I don’t use this mode very often, but then again, I always want my kick sound to bark and roar.
API Style Compressor
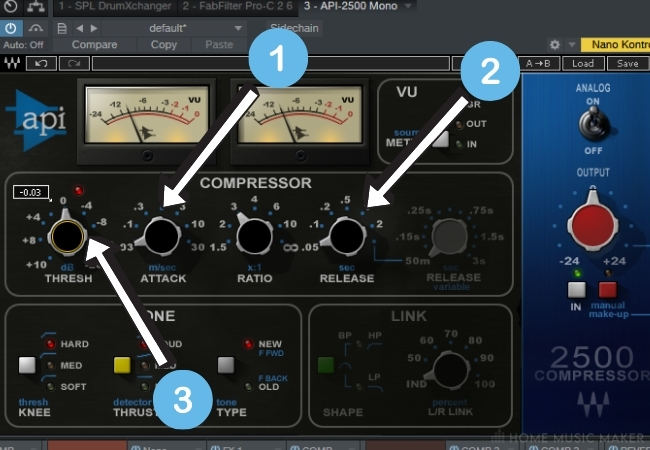
API is my go-to compressor when I want to boost the attack of my kick drum. It focuses the sound in a tight way that I inevitably use on almost every low-end heavy source.
Although it is perfectly capable of being used in a “polite way,” I rarely use it for that. I crank the attack all the way to its slowest setting (1), release it to its fastest (2), and start increasing the threshold (3) until I start hearing that pleasing punch coming through.

This compressor works almost like a transient shaper.
It’s so extreme on both sides of the spectrum. Turning the attack knob all the way to the fastest (1) setting really tames the kick drum and shifts the energy to the low-end, especially with the tone section switched to “Loud (2).”

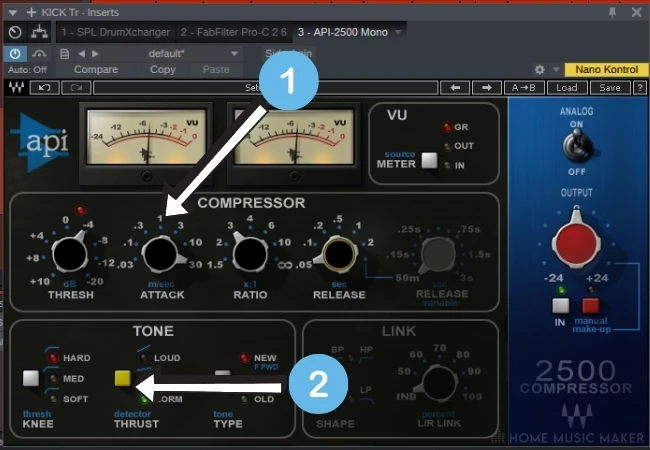
And as always, pay special attention to what’s happening with your low-end of the kick after compression. In most cases, you either want to maintain the same amount of bass frequencies or, if the source sound lets you only slightly reduce it.
1176 Style Compressor
This legendary compressor is the penultimate one that made its way to my list of go-to compressors for kick drums.
It’s actually quite the opposite of the FabFilter one. It definitely has its own sound that is intrinsic across the settings you tweak.
I know it’s hard to do justice to sound through words, but I always get this “puffy” feeling when I use it on drums, especially on the kick. This “puffiness” can be just the sound you’re after, and if not – it’s better to bypass this compressor altogether.
There’s just no way of getting rid of it since it’s built into the circuitry.
Even on its slowest attack (1), it still doesn’t bring out as much attack as other ones discussed here, but I never really use it for that purpose anyway.
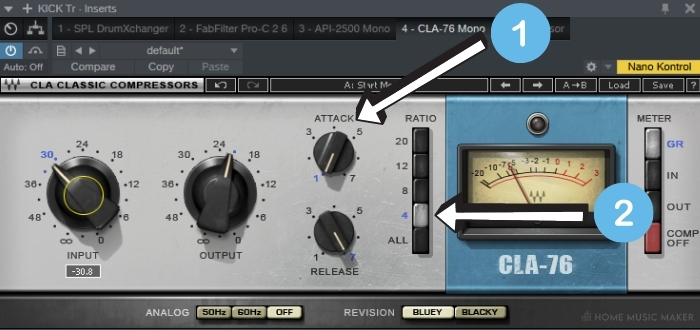

I believe the secret to its sound lies in the saturation that it provides. Even on a 4:1 ratio (2), it still sounds slightly crunchy. On 20:1 or ALL (3), it’s just full-on distortion, and I love the way it sounds.
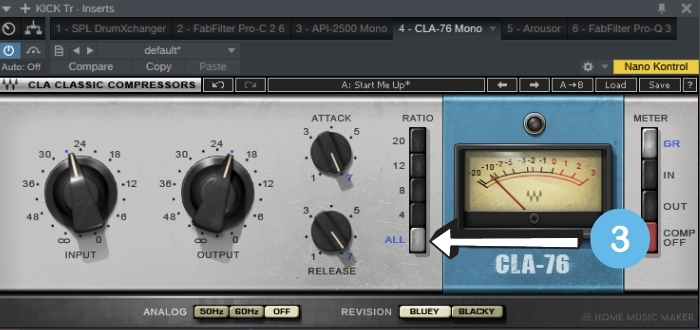
When it comes to specific settings, it doesn’t matter that much with this particular compressor. I mean, sure, it will choke the transients with the fastest attack and let through more on the slowest setting, just like any other compressor.
But the main selling point of this compressor is the specific way it colors the sound.
I mainly use it to crunch up my kick and give it a bit of a vintage vibe.
One thing to bear in mind is that its attack and release settings have reversed values compared to other compressors. This is something that plugin developers have modeled from the hardware unit.
Distressor
Finally, we have the Distressor, which is definitely the most intense compressor out there.
It’s revered for its fantastic ability to smash the signal in the most pleasing way possible. I like to think of it as 1176 on steroids!
It really does some amazing stuff on pretty much any signal.
Its sound is based mainly on the saturation it gives, similar to 1176. Even with the slowest attack, it will not sound too “spiky” like API and FabFilter.
To my ears, it differs from 1776 in the way it focuses the saturation. With 1176, lower midrange saturation gives it that ‘”puffy” sound, while Distressor seems more focused in the upper midrange.
I generally use it to change the character of my kick drum.
Kick drums often get too “clicky” on the attack after compression, but the Distressor always places the attack in the pleasing midrange. It also brings out a lot of the tail and boom, which I prefer for slower songs.
I start with the slowest attack, fastest release and apply quite a bit of gain reduction.
Generally, I like to use pretty extreme settings with this compressor because it gives that particular, punchy sound when pushed hard.
However, this will also crush your low-end completely, so using the sidechain compression input filter is necessary.
Compressing your kick with the Distressor and looking for a clean and soft sound is perhaps a bit counter-intuitive, but it certainly can be achieved.
It’s great at warming up the sound and breathing some life into sterile kick samples.
The only thing you’ll have to be aware of is the amount of bass frequencies you lose with more extreme settings.
FAQ – Kick Drum Compression
Why use kick drum compression?
Although it’s perfectly fine not to use any compression on the kick, we need a specific part of the sound enhanced most of the time. More often than not, we look for more punch and attack in the kick. In that sense, compression is the critical component in getting that sound.
What ratio, attack, and release do you usually set on it?
Most of the time, I use slow attack, fast release, and the ratio between 3:1 to 10:1. This will change depending on the compressor I use, but 90% of the time, this is the setting I use.
What is the best kick drum compressor?
It’s hard to tell because everyone has its own flavor, but if I had to go for one, I would probably choose the FabFilter Pro C 2, just because it’s so versatile.
How much gain reduction should you aim for when compressing a kick drum?
If you’re going to use drum bus compression and a mix buss compression (which you likely will), I won’t go over 6dB of gain reduction on individual channels. You are likely to over-compress if you use too much right from the start.
Does parallel compression work better than standard compression?
Parallel compression is a great way to maintain the natural dynamics of a performance. If you want greater control over your compression levels, I highly suggest trying it out.
How do you know when there’s too much compression on a kick?
My inner red lights start blinking when I hear that my kick starts losing the impact and punch in the low end instead of being even more present after compressing.
Should you compress your kick samples?
Most of the time, samples already sound kind of mix-ready, but there’s always some room for improvement. I would suggest compressing but not going crazy with it, especially if you use a kick sample to augment your already good-sounding kick.