A common question asked by new producers and those who have moved to Ableton Live is ‘how to bounce a track in Ableton?’.
First of all, what do we mean by ‘bouncing a track,’ and secondly, how do we do it?
What Does ‘Bouncing’ Mean?
Bouncing a track refers to converting a track to an audio file. Typically, we producers use a lot of MIDI in our songs.
An issue with MIDI is that it can be CPU intensive, depending on the virtual instruments you use.
To avoid latency issues and those annoying crackles and pops, we convert MIDI tracks to audio, which uses less processing power.
For this tutorial, you will need:
- Ableton (I will be using Ableton Live 10, although the process is the same for other versions).
- An individual track you would like to bounce to audio.
There are at least two ways to bounce a track in Ableton. The quickest way is to ‘freeze and flatten.’
Let’s look at how.
Step 1: Freezing Tracks
In the arrangement view, right-click on the selected track that you want to bounce to audio, and you will see the option to ‘Freeze Track.’ Left-click on Freeze Track.
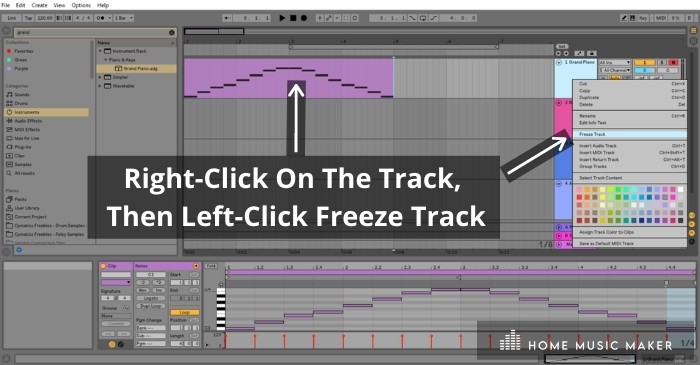

This temporarily renders the information from that track as audio, freeing up your CPU. You cannot change anything on that track while it is frozen, including any automations.
To make changes, you need to right-click and click ‘Unfreeze Track.’ However, if you are happy with the work you have done on that track, you can complete the bouncing process.
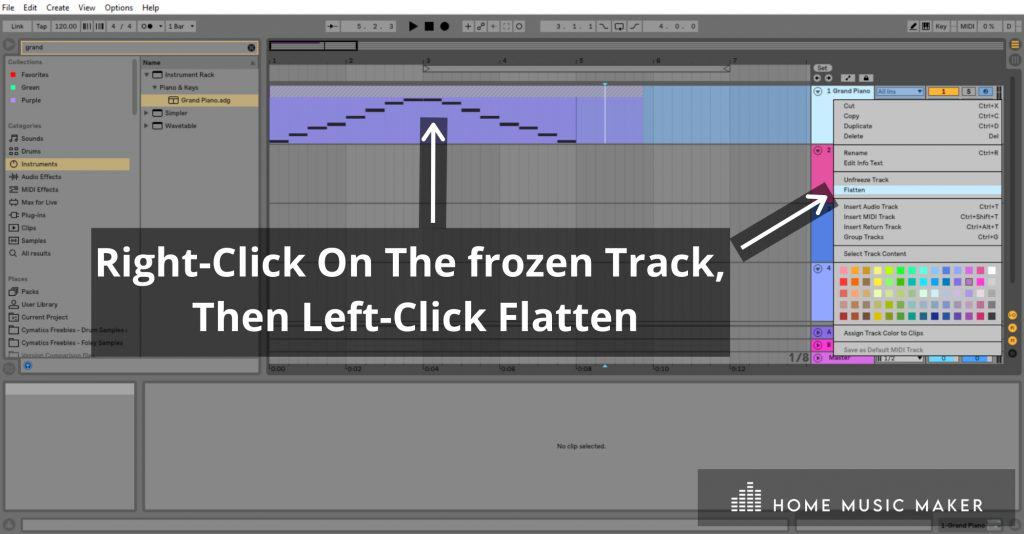
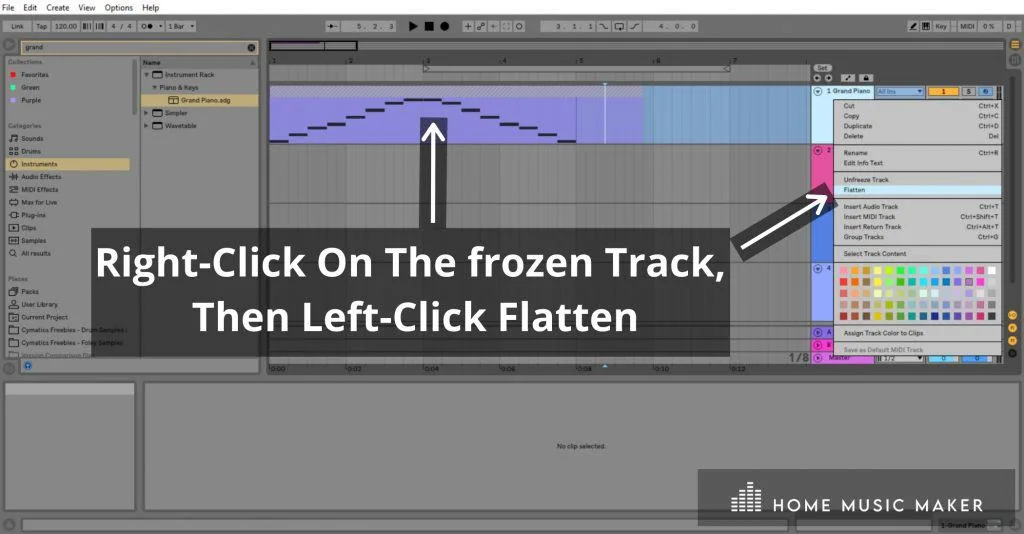
Step 2: Flatten Track
To commit to bouncing your track to audio, right-click the frozen track and left-click ‘Flatten.’ This renders your track with all its features (including automations) to audio.
Hey presto, you have bounced a track in Ableton!
As a bonus to making your project less CPU intensive, you can now enjoy messing with the audio track in ways that you could not with the MIDI track.
For example, you can cut and slice the track, mess with warping, reverse it, the list goes on and on.
There are advantages and disadvantages to this bouncing technique.
Advantages:
- It is quick and easy.
- It frees up your CPU.
Disadvantages:
- You cannot make changes to the original track.
- If you want to change the melody or the synths you used, you will not be able to do so.
- It does not render any sounds that may come after the clip, such as reverb, delay, etc.
Resampling The Track
If you think that you may want to change something about the melody, or the automations or synths down the line, you may be better off ‘resampling.’
Resampling means taking the signal from one track and recording it as audio on another track.
In this way, you can keep the original track in case you ever want to change it.
Let us look at how we can bounce a track in Ableton using the resampling technique.
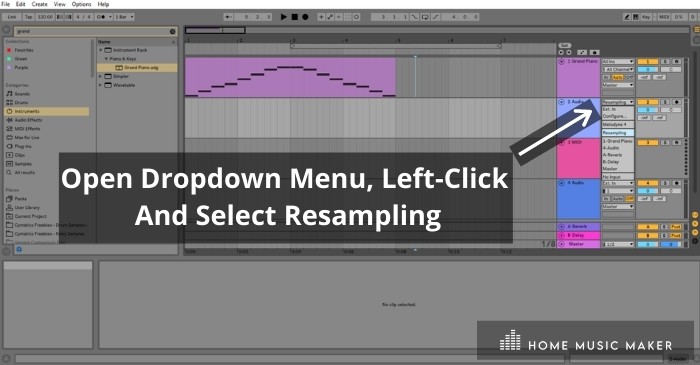
Step 1: Prepare An Audio Track For Resampling
From the top window box on your chosen audio track, left-click the down arrow and click ‘Resampling.’

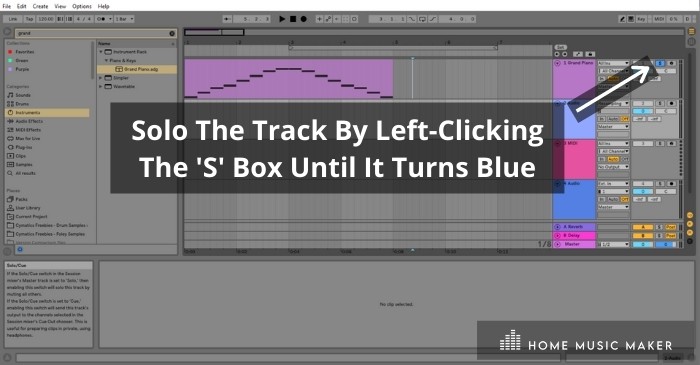
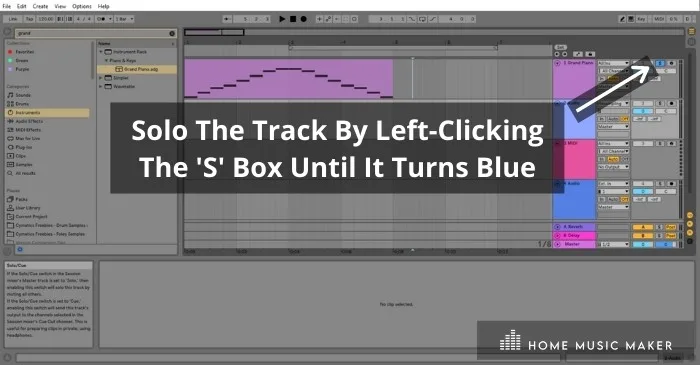
Step 2: Solo The Track You Want To Bounce
You will see here that I have left-clicked the ‘S‘ box on the track I would like to bounce. It turns blue when you click it.
Step 3: Arm The Audio Track For Recording
Left-click the Arm Arrangement Recording button on the top right of the audio track (the track you want to record onto) to prepare it for recording. Once you click it, it will turn red.


pro tip
You will notice that it says the name of the buttons and describes their function in the bottom left window of Ableton when you hover your mouse over them.
Step 4: Record
Once the audio track is armed for recording, you will need to make sure that the Arrangement Insert Marker (the blue line) is set to the start of the track you want to bounce.
To move it, simply click the line at the start of the track.
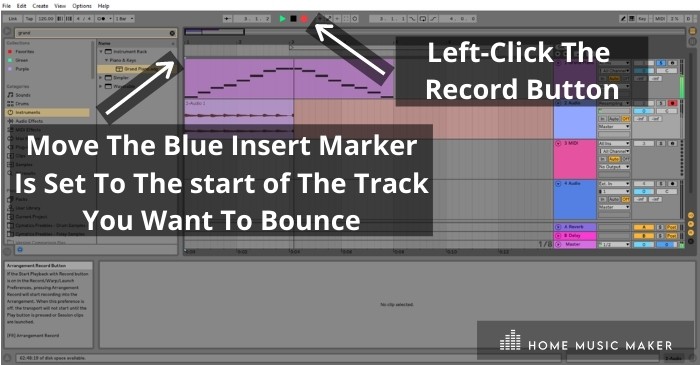
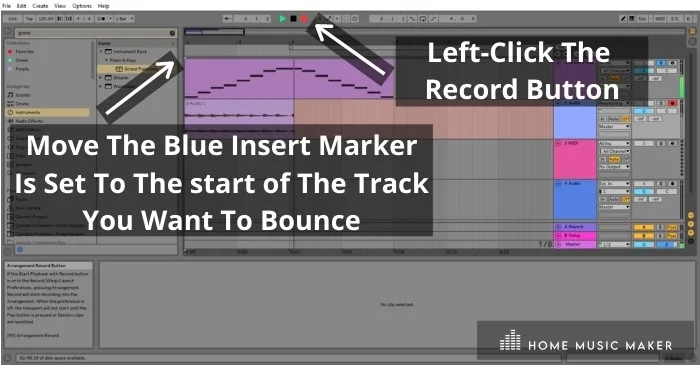
Once you have done that, click the record button up the top of the DAW. You will know if you have done this correctly because the button will turn red, you will hear the track, and you will see the audio file appear on the audio track.
To stop recording, press the stop button or press the spacebar.

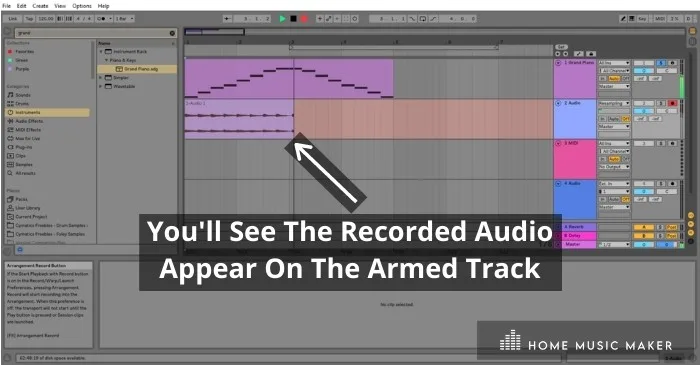
If you are using delay or effects on the original track that last longer than the clip, allow the recording to continue after the clip until the effects are no longer being used.
Step 5: Conserve CPU
By now, you will have successfully bounced a track in Ableton Live using the resampling technique. However, if you want to conserve your CPU, you should mute the original track and disable any effects you have on it while it is not in use.
Alternatively, you can also freeze the original track and mute it by clicking the yellow bar on the track.

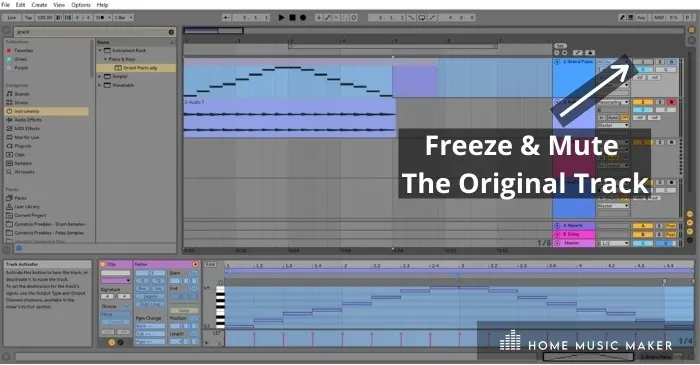
If you want to go back and change the original track, you can; to do so, you just need to unfreeze the track. Then, if you want to bounce it again, follow the steps we’ve already discussed above.
Advantages:
- It keeps the original track, in case you want to change it later.
- It allows you to render any sound that comes after the clip as audio.
Disadvantages:
- It takes more steps.
- It leaves the original track on the screen, which can be cumbersome to look at when using the arrangement view.
- It can be easy to forget to disable the original track when not in use.
How To Bounce A Track In Ableton – FAQ
What is the difference between bouncing and exporting?
Bouncing refers to instances where we render a track to audio within the session in Ableton. Exporting refers to bouncing a track to audio and saving it outside of the DAW (say, on your hard drive somewhere).
Exporting can be used to save samples that we like and may wish to use again. However, exporting typically refers to the process of rendering an entire project (e.g., song) as an audio file, called a mixdown.
How do you bounce a mix for mastering?
Click on File, click Export Audio, choose the file type (I choose WAV), choose bit depth (I leave mine at 32), leave dithering unchecked unless your mastering engineer requests something; in particular, click Export.
Don’t forget to leave at least -6db of headroom for the mastering engineer to work their magic!
I’m so frustrated. Can anyone please tell me how to bounce down tracks in Ableton Live 9 lite?
You can bounce tracks in Ableton Live 9 Lite the same way as I have shown you here. Just follow the steps.
Does freezing tracks save RAM?
Not exactly. Only flattening the track to audio will save ram.
Can you convert MIDI to audio?
Yep! Using the techniques I show you above, you can convert a MIDI clip to audio.
Should I bounce before mastering?
That depends. If you are mastering the session rather than a mixdown, then yes – it will free up processing power for the master.
It can also help with minimizing the time it takes to create a mixdown of your project.
Why do you want to make stems?
Some people bounce multiple tracks (such as guitars or bass) to single audio files (stems) to process those sounds together.
Final words
Bouncing tracks to audio is a simple but effective technique that you should really try and get into the habit of using. Not only do you conserve CPU, but it also helps you commit to an idea, preventing you from constantly tinkering with it. (a bad trait of mine!)
A fantastic mix engineer taught me the best technique to mixdown a song is to bounce the stems to audio and create a dedicated final mix project. Not only will this help with a quicker workflow, but it also gives you the ability to make small edits to each stem.
However, the main advantage for me is it keeps the music production and mix down stage completely separate and stops me from making arrangement changes and focusing on the mixdown.
Another advantage is it’s also great for creating your own samples.
For example, if you write a drum loop using the Ableton Live Drum Rack with lots of individual parts, you can bounce it down and create your own drum break. This then becomes ready to drop into any track or even create your own sample pack. Pretty cool!