Building a computer for music production yourself might seem like a daunting task, but with the right guidance, it can be a walk in the park.
With computers taking over a central position in most studios, it is well worth spending some effort choosing the best option within your budget.
In this article, I’ll suggest a couple of configuration options to get you started, along with a step-by-step guide on putting all the parts together.
Let’s dive in!
Why Build A Music Production PC Yourself?
There are a couple of benefits to building a computer yourself. First of all, it’s much cheaper as pre-built options can cost significantly more. This way, you can be sure to maximize value for the money.
Pre-built systems can contain outdated and non-upgradeable components, forcing you to buy a new machine far earlier than expected.

With pre-built options, you also run a risk of having mismatched hardware. Manufacturers can put in a couple of flashy components to aggressively advertise it at a lower price and then skimp on the rest of the hardware.
You may end up in an unfortunate situation where your machine, although it may have relatively good components, can’t reach even 70% of its potential.
If you feel intimidated by the thought of unintentionally breaking a component during the building process, I encourage you to try building a computer yourself regardless.
There are really not many things that can go wrong as long as you are patient, careful, and not forcing any component into the socket.
If in doubt, you can always consult a YouTube tutorial or ask for help in one of the numerous forums online.
Which Components Should You Choose?
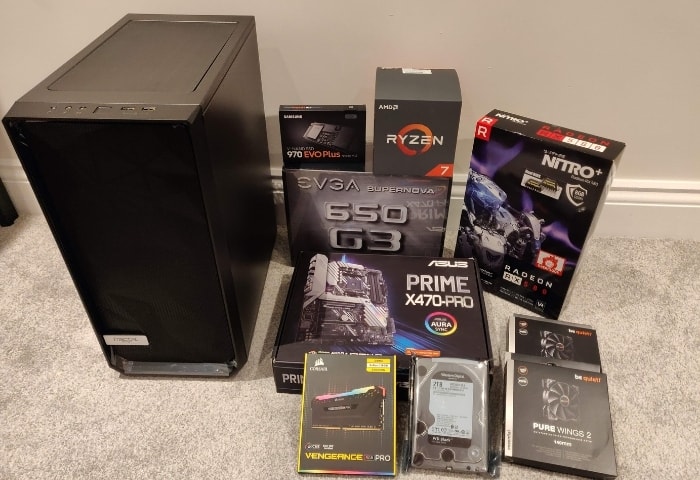
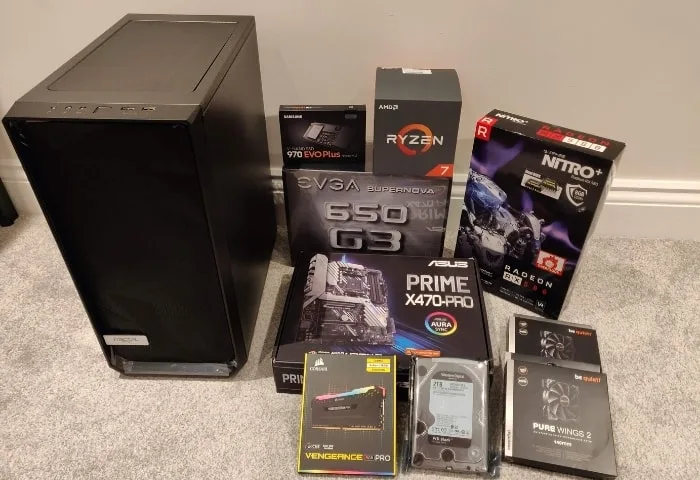
Let’s go through all of the components and discuss which ones could be potential candidates for your future rig.

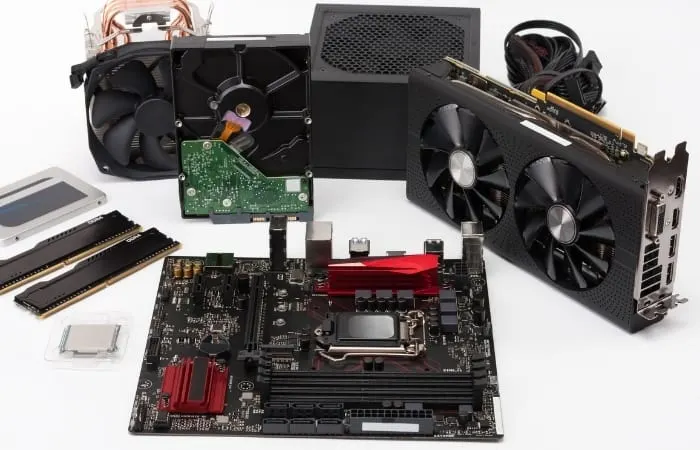
I’ll suggest a budget option and a high-end one and also look at the different chipset offerings. It’s important to note that with the budget option, you’ll still have a smooth-performing machine.
How Much Ram Do I Need For Music Production?
The most relevant question regarding this component is how much RAM do you need.
While most DAW’s (digital audio workstations) suggest having a minimum of 4GB, 8GB/16GB is probably the way to go. You could still run your VST’s relatively fine with 4GB, but you’ll easily hit the limit if the projects get a bit ambitious.

To ensure you are prepared for more intense sessions, it’s wise to get 16GB of RAM if possible. Some people even use 32GB, but I personally think that might be a bit overkill. With careful resource management, even 8GB could handle bigger projects.
A crucial thing to keep in mind is to make sure that you buy compatible RAM since different types are not compatible with each other. You cannot have a DDR4 and DDR3 working together in the same machine.
Another potential trouble-maker is the speed of individual sticks (I’ve gone with 3200). To ensure more stability of your system, it’s best to buy a matching pair of sticks with the same specs and the same manufacturer.
You won’t have to look hard, as most of the RAMs are sold in pairs anyway.
There are a lot of companies that make solid and reliable RAM. I can recommend Corsair Vengeance RGB Pro DDR4 8GB as it works flawlessly. It also lights up the casing with beautiful RGB lighting, adding to your rig’s aesthetics; there is also non-RGB if the lighting isn’t your thing.
If you opt for a higher-end build, I would suggest buying a pair of 8GB so that you can be worry-free with 16GB.
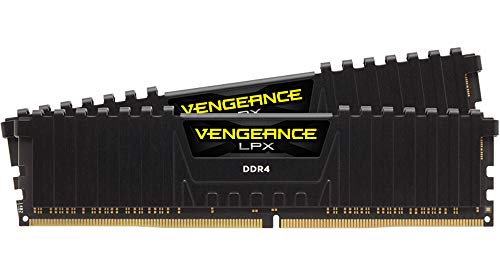
Corsair Vengeance LPX 16GB (2x8GB)
- A high-performance PCB.
- A solid aluminum heat spreader efficiently dissipates heat.
- Available in multiple colors.
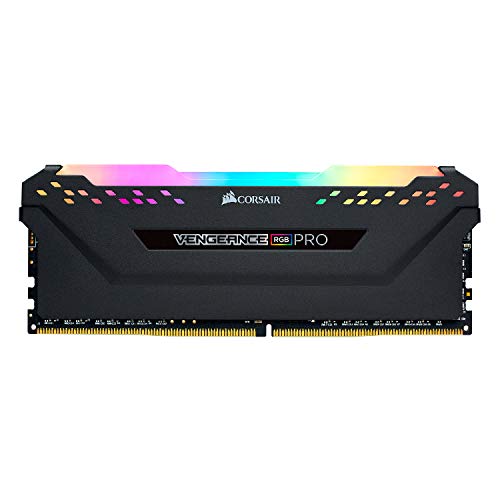
Corsair Vengeance RGB PRO 16GB (2x8GB)
- Dynamic multi-zone RGB lighting.
- Next-generation software.
- Custom performance PCB.
Best CPU For Music Production
Along with the RAM, the CPU is the most important part of your PC or the most relevant for music production purposes.
There is an age-old argument over whether AMD is better than Intel. For music production, I’d say that AMD proved itself more than able to handle even the most intense mixing situations.
I could never justify spending extra money on an Intel CPU, while I can get an AMD chipset in the same quality range that runs just as well for less.

Ideally, the processor speed should be higher than 3.0GHz with as many cores as you can afford. Any relatively newer CPU from AMD’s Ryzen series is worth your money.
If you can afford Ryzen 7 2700X with 8 cores of 3.7GHz, you’ll casually run dozens of high CPU VST’s without worries of overload.
A great budget alternative is Ryzen 3 3300X. You’ll enjoy pretty much the same level of comfort in performance, but perhaps you’ll need to watch out for those unnecessary CPU-intensive plugins like Omnisphere’s hanging on you.
If you opt for an Intel PC build, i7-9700K or a budget version i5-3450 work just as well. They are a bit pricier, though.
Whenever you decide on a CPU, make sure to check if your motherboard supports that chipset type.
Also, most CPUs will come with a built-in CPU fan to aid with keeping it cool.
Best Motherboard For Music Production
Since the motherboard is the central piece of your PC build, you should take your time and double-check whether all the other parts are compatible with it.
It’s also crucial to consider the supported socket types and their speed range. By choosing the right motherboard, you shouldn’t have to replace it for years as it will still support the new series of hardware.
ASUS and Gigabyte are the most popular ones on the market, and for a good reason.
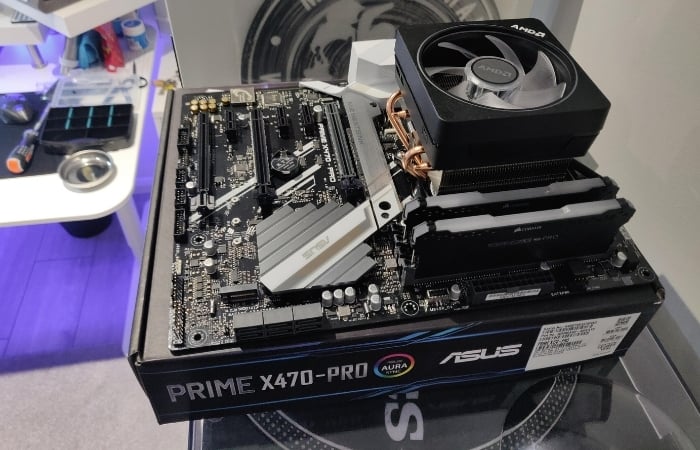
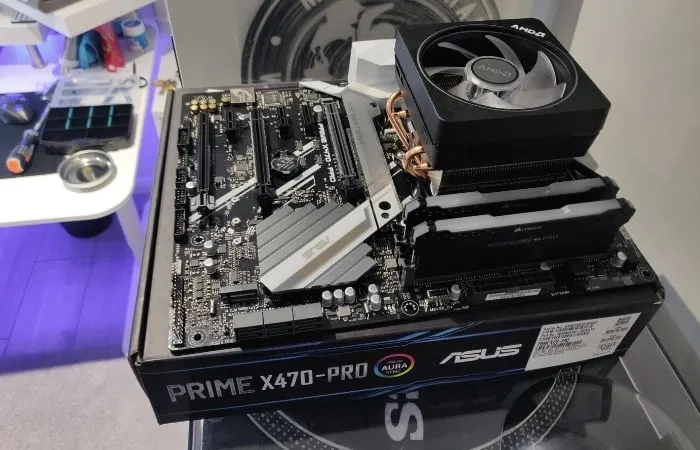
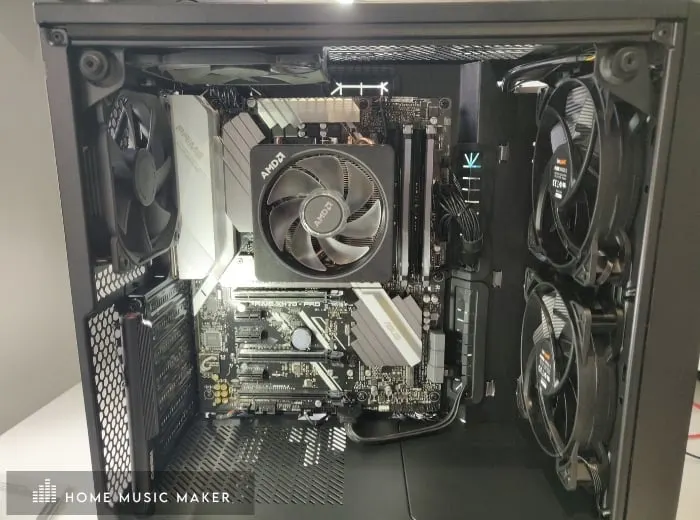
I have been running my rig on ASUS Prime X470 Pro and never had any trouble with it; however, I really like the look of the ASUS WS X570-Ace.
For an Intel option, Gigabyte Z390 also works great for music production.


I would also recommend going with the ATX form factor. Unless space is an issue, there’s no need to go smaller as you can run into overheating problems. Some of the smaller ATX’s have fewer RAM sockets, which can become a problem if you ever decide to upgrade.
You’ll most likely have to completely replace your board instead of adding to an existing setup, which would cost you a lot more.
Also, full ATX motherboards usually have more USB ports which can be essential once you start upgrading your studio with the new equipment that mostly utilizes USB connectivity.
All of the recent motherboards support AM4 socket type for AMD CPUs and LGA 1151 for Intel.

ASUS AMD AM4 Pro WS X570-Ace
- 3 PCIe 4. 0 x16 Slots with optimized lane arrangement.
- Ultra-fast storage: up to 64bps Dual M.2.
- Reliable and responsive ECC memory.
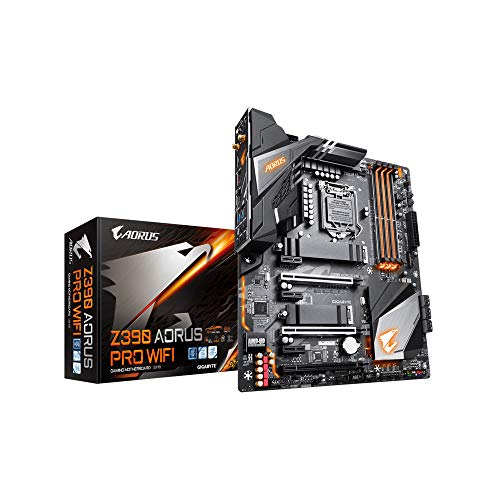
GIGABYTE Z390 AORUS PRO
- Supports 9th and 8th Intel Core processors.
- Dual-channel non-ECC unbuffered DDR.
- 12+1 phases digital VRM solution with DrMOS.
Best Hard Drive For Music Production
You have the option to choose between two types of hard drives – SSD and HDD.
SSD, which stands for solid-state drive, is a newer storage technology and much better than HDD in every aspect.
NVme SSD technology can run your system a lot faster and, as long as you do not overload it with data, it will last you a lot longer and be more reliable.
HDD (hard disk drive) still has its purpose, though. They are much cheaper and offer you huge storage space.
If you can afford to go all SSD, that’s probably the way to go. However, 1 TB of SSD can be quite pricy. To get the benefits of both worlds, most people use a combination of SSD and HDD.
The idea is to use the SSD as your main hard drive to run your system and essential programs like your DAW. All the other plugins, VST’s, and project files can be stored on HDD.
You can, of course, choose to run a certain VST on the SSD if you want extra speed and stability. That way, you still get SSD benefits while having a lot of storage space without busting the bank.
There are plenty of good manufacturers like Samsung, Intel, Toshiba, and HP. Going with any of the mentioned will be a good choice.
I personally use Samsung 970 EVO plus SSD (500GB) as my main drive. Options are ranging from 250GB to 2TB. If your budget is low, 250GB could work with careful management, otherwise go as high as you can afford.

For the HDD, Western Digital and Seagate BarraCuda are great choices in either budget or high-end build. Considering their amazing performance for a low price, it’s a no-brainer.
I’d recommend going for at least 1TB, as virtual instruments and sample packs are getting larger by the day, and if you can go for the 7200RPM versions for improved speed, that would be beneficial.
I have a 2TB Western Digital Black and a 2TB Seagate BarraCuda; both perform excellently and give me bags of space for everything I need….. for now!
It’s worth noting different brands use different coloring systems for their hard drives. For example, Western Digital Black is their top-spec HDD, whilst BarraCuda Green is their standard Eco model.

SAMSUNG 970 EVO Plus
- Sequential read and write performance.
- Powered by Samsung V-NAND Technology.
- Seamless cloning and file transfers.
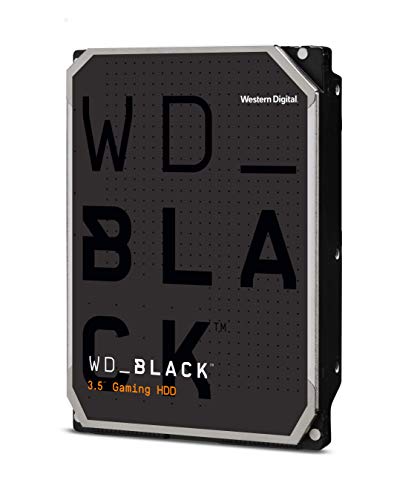
Western Digital WD Black
- 7200RPM.
- 2X DRAM cache up to 256 MB for faster read operations.
- 5-year manufacturer’s limited warranty.

Seagate BarraCuda
- 7200RPM.
- 256MB Cache.
- SATA 6Gb/s.
PSU (Power Supply)
A good power supply is essential to keep all of the components working well and ensuring the longest lifespan. Here is no time skimp. Spending a bit more on a quality PSU is a wise investment. Units like EVGA G3 650 will work fantastically well, and they are not that expensive either.

With a music production computer, where you don’t need a monster GPU, wattage usually isn’t something to worry about, so anything around 500W should be plenty. Having said that, you should still work out how much wattage you will be drawing and add a 20% buffer just in case.
In a budget build where you want to save wherever you can, Corsair CX450 is a slightly less expensive option but still an excellent choice.
Power supply units are rated with a number and a color denoting their efficiency. You want to aim to get an 80 Plus rated PSU and the best color you can afford, from bronze to titanium. You can check out more about PSU ratings here.
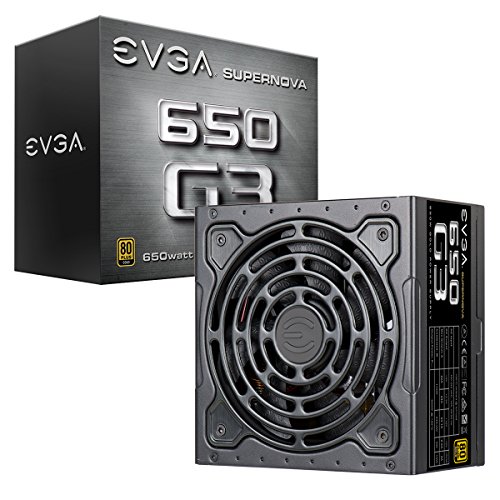
EVGA SuperNOVA 650 G3
- 80 PLUS Gold certified.
- Fully-modular.
- Hydraulic dynamic bearing for ultra-quiet performance.

Corsair CX Series
- 80 PLUS Bronze certified.
- Thermally Controlled Fan.
- Semi-Modular.
Additional Fans
When it comes to the fans and cooling, you want them to be as silent as possible. In a situation where your PC is in the same room as your recording setup (which is almost always the case in home studios), fan noise can ruin your otherwise perfect recording.
This is especially an issue when trying to record delicate acoustic guitar parts or do voiceovers. You might think your fans are silent enough, but once you crank the microphone gain to capture every detail and nuance, you’ll be surprised to hear a very audible noise from your computer.

For that reason, anything from be quiet! is a good buy. I personally use Pure Wings fans, and they bring the fan noise down to a minimum. They can easily be used in a budget build as well since they are not that expensive.

be quiet! Pure Wings
- 120mm.
- Silence-Optimized Fan Blades.
- Rifle Bearing Technology.
Alternatively, you can use a liquid cooling system.
A big advantage is that it’s almost noise-free and cools your PC quite efficiently. It is pricier, though, and is prone to breaking more often, so I would still advise you to go for a fan cooling.
Computer Case
Casing for your components should be big enough to comfortably accommodate all of your hardware and have lots of places to mount your fans. As the heat rises, having those mounts on top of the casing is great for exhaust fan configuration, but even traditional side vents do the trick.

You might also want to consider the placement of your USB ports. Personally, having those at the front of the casing saves me a lot of trouble as sometimes USB cables can be too short of reaching the back of the casing.
Besides these three parameters, everything else about your casing is a matter of looks.
Many people prefer to have one side of the casing transparent, so you can see all of the components in action and even install some cool LED lighting.
The casing I recommend for this effect is Fractal Design Meshify C, and I love it! It looks awesome and has incredible airflow, along with been really user-friendly to build, especially for a first-timer.
If aesthetics don’t concern you, you can go with the plain casing like Cougar MX330-G and save some money. It may not look as flashy, but it has all of the features you need.

Fractal Design Meshify C
- Tempered glass side panel.
- Angular mesh front panel maximizes air intake.
- Two preinstalled Fractal Design 120 mm fans.
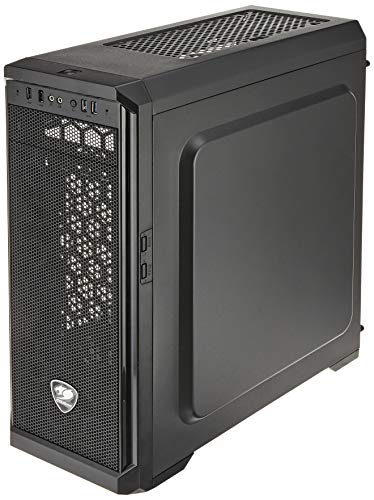
Cougar MX330-G
- Tempered glass side panel.
- 7 PCI Slots.
- Excellent cooling.
GPU (Graphics / Video Card)
I have intentionally left the graphics card as the last component to review as it is the least relevant to music production. Even an integrated GPU that comes with your motherboard should suffice.
However, it is not uncommon for music producers to work with video, especially when scoring a soundtrack for a movie or TV show.
If you happen to be involved with similar work, I’ll discuss some good options for this; otherwise, you can safely ignore this part and go with the cheapest GPU your motherboard supports or even roll with the integrated one.

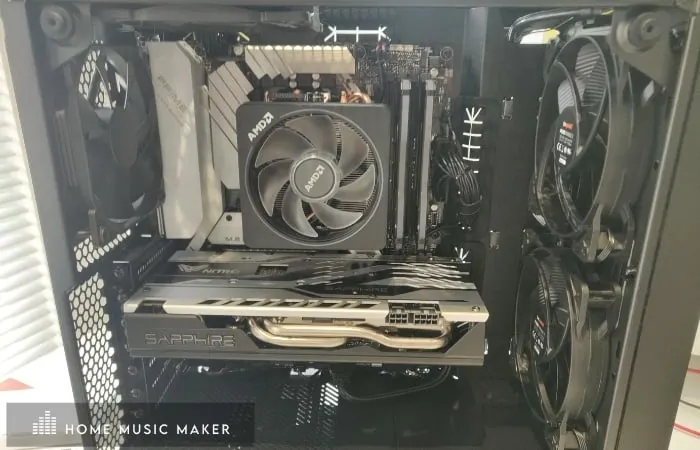
You most likely won’t need a full-on graphics card that pro video editors use. To smoothly run DAW’s that have heavy video support like Nuendo, Radeon’s RX series should easily handle all of your tasks.
A card like RX 580 with 8 GB of VRAM is probably more than enough. If you want to save some money, go with the 4GB version or an RX 570, as it’s still pretty powerful, at least for music producers.
If you’re going down the Intel route then check out the Gigabyte GeForce GTX 1650 D6.
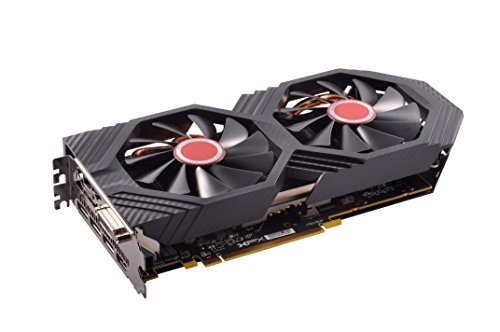
XFX Radeon RX 580
- 4th gen GCN graphics cores.
- XFX double dissipation cooling technology.
- Multiple factory GPU overclocked settings.

PowerColor VGA – AXRX 570
- Boost clock 1250 MHz.
- 1 x DL-DVI-D 1 x HDMI 3 x DisplayPort.
- 2048 Stream Processors.
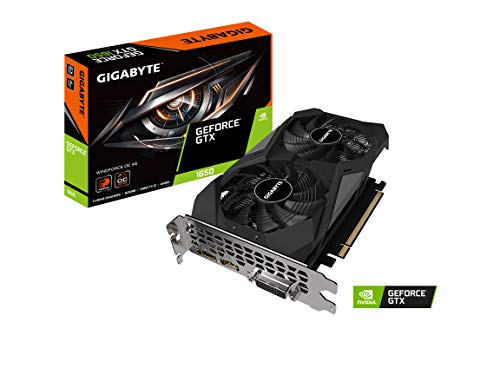
Gigabyte GeForce GTX 1650 D6
- NVIDIA Turing architecture and GeForce Experience.
- Integrated with 4GB GDDR6 128-bit memory interface.
- WINDFORCE 2X Cooling System with alternate spinning fans.
General Buying Tips
There is a lot of debate about whether you should buy new or used hardware for your PC. I tend to be more inclined towards buying new stuff, as you are protected by warranty for years to come and take no chances with the second-hand gear breaking down after a couple of months. After all, it is a hefty investment, and you don’t want to risk wasting months or years of saving up.
Having said that, buying second-hand hardware from the trusted sources is a great alternative. Your best bet is to buy from your friends as you probably know how well they’ve maintained their computer. You can get a first-hand experience of the machine’s limits and how it behaves under different circumstances.
The second-best option for buying used gear is to buy from online sellers that have impeccable reviews. By impeccable, I really mean not having a single problem with any customer, ever! I learned this lesson the hard way, so trust me on this. Honest sellers will usually give you a warranty for a couple of days or a couple of weeks even and agree to a refund without question if you decide to do so.
Whether you are buying the most recent or older generation of components, it’s important to think about future-proofing. If you plan on busting your bank and buying all the newest generations of components, it’s worth checking out if the near future offers some better equipment.
Big companies usually announce their new product line a year earlier, so you might want to consider waiting for a new generation to become available for purchase. That way, you make sure that your rig will be upgradable and relevant for many years.
With that all said, let’s get on with the build.
Building A Computer For Music Production
Tools Needed
- Cross-head / Phillips Screwdriver (Ideally magnetized)
- Anti Static Wrist Strap
- Magnetic Dish (Great for holding loose screws)
- Side-cutters / Scissors
- Small Torch (Ideally with a magnetized base
- Variety Of Cable Ties, Twist-ties, and Velcro ties
- Anti-vibration Fan Mounts
Building the PC yourself might seem daunting, but this step-by-step guide will hopefully make the process clearer and less intimidating.
It’s important to know which parts are susceptible to physical damage and take extra care when handling them. Otherwise, there’s not a lot that can go wrong, really.
| Image | Product | Features | Price |
|---|---|---|---|
Screwdriver  | Bahco 1/4-Inch Hex Shank Bit Holder |
| Latest Price |
ESD Protection  | ESD Anti-static Wrist Strap |
| Latest Price |
Screw Holder  | 4 Inch Magnetic Parts Holder |
| Latest Price |
Cutting Ties  | Hakko-CHP-170 Micro Cutter |
| Latest Price |
Torch  | NEBO 250 Lumen COB LED Flashlight |
| Latest Price |
Cable Management 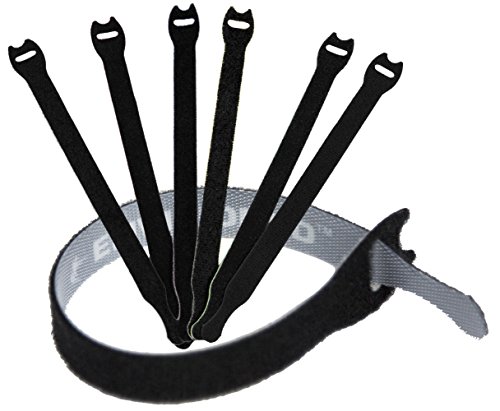 | Reusable Cable Ties – 30 Pack (Black) |
| Latest Price |
Fan Mounting  | Noctua NA-SAV2 |
| Latest Price |
It’s a good idea to earth yourself when handling the motherboard and CPU to prevent any static electricity from damaging your components.
It is pretty unlikely to happen, but why take the chance!
Step 1: Prepping The Case
The first thing you’ll want to do is take the computer case apart by removing all its panels. It’s important to hold on to every screw you remove – at least initially. This is where the magnetic dish comes in handy.
Also, be aware; you will usually find a small cardboard box inside the case containing all the accessories that come with your case, along with the instructions.
This is the perfect time to install cooling fans where you need them. Just be sure your setup stays balanced, so there’s as much air being drawn in as it’s being blown out.
If you aren’t sure which direction the wind will go, the fan guards usually indicate an arrow in which way the air flows.
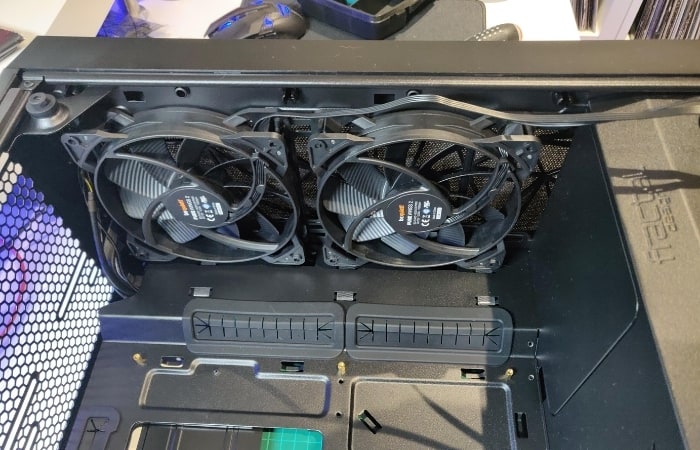
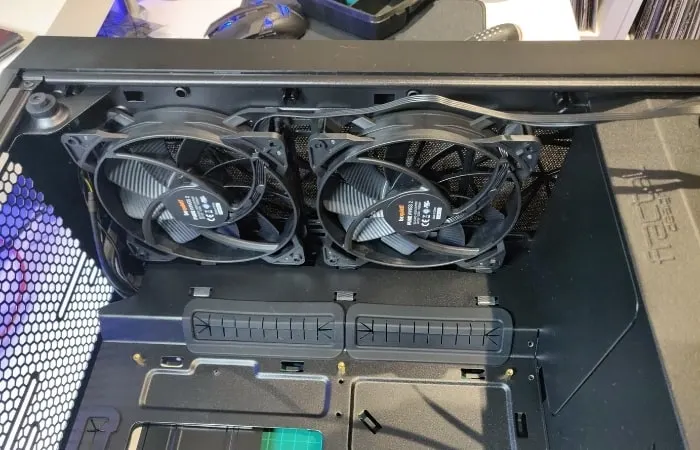
A typical PC will have front intake fans that pull air into the case and exhaust fans in the computer’s rear. If you really want to keep your PC extra cool, you can add an exhaust fan at the top of the case.
As you know, it’s important to reduce unnecessary noise, so it’s a good idea to use rubber anti-vibration fan mounts to keep vibration to a minimum.
Next, grab your motherboard’s rear I/O shield and push it into the back of your PC case from the inside. Ensure it’s right side up by matching the pattern of cutouts to the ports’ arrangement on the back of your motherboard.
Make sure you work your way around the whole edge of the shield; you’ll know when it’s in place as they’ll be a nice click sound.

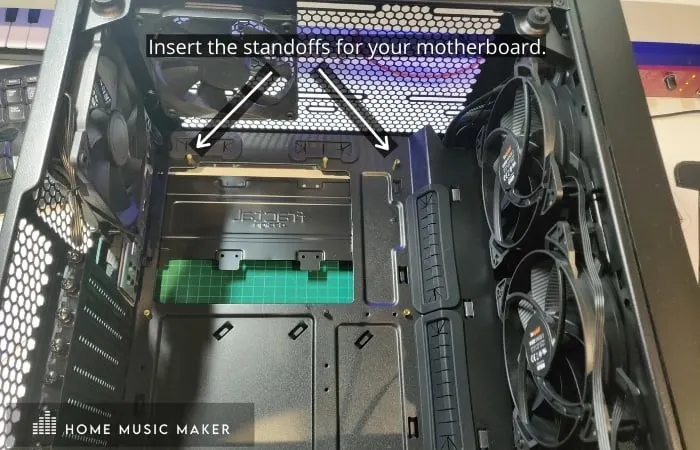
Finally, it’s time to prepare the standoffs for the motherboard to fix onto. Some cases already have the standoffs preinstalled; if not, screw them into the marked-out holes inside the case.
Different size motherboards will use different standoff locations, so if you are unsure, check the manual. If any preinstalled ones are in the wrong locations, simply unscrew them and take them out.

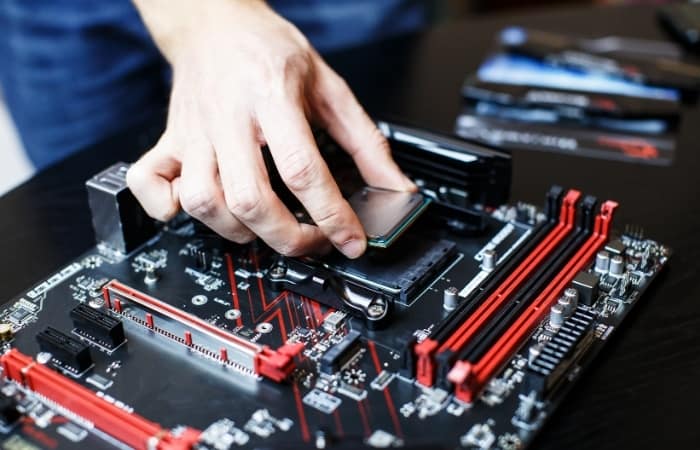
Step 2: Installing The CPU
CPUs are notorious for being very delicate and needing special attention when inserting them into the motherboard.
Make sure to handle it gently and apply zero force when placing it into the motherboard socket. If you have to force its way in, you probably misaligned something and need to readjust the positioning.
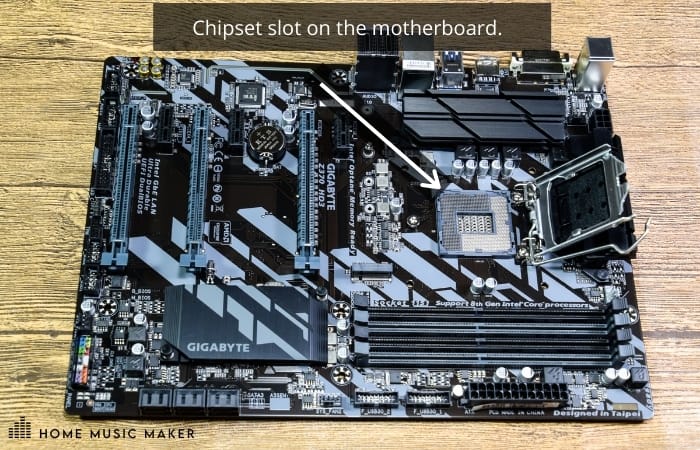

This is probably the trickiest part of the build so take your time, placing your CPU into the CPU socket.
First of all, figure out which is the correct way to position the CPU against the socket pattern.
A marker on the CPU corner should align with the same marker found on the socket.
The two must align, as there is no other way to insert it without causing damage.
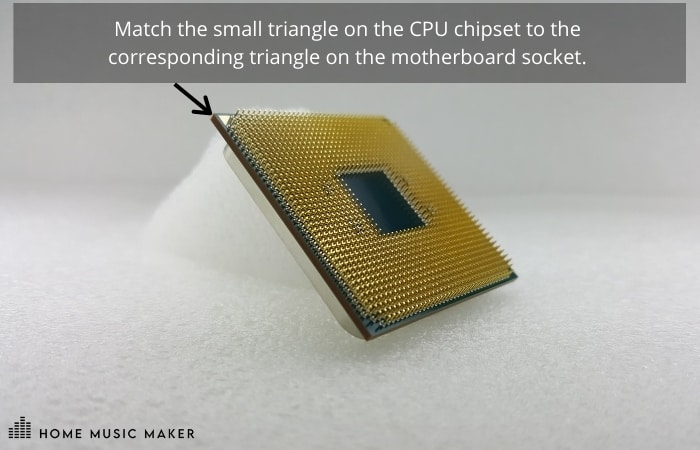
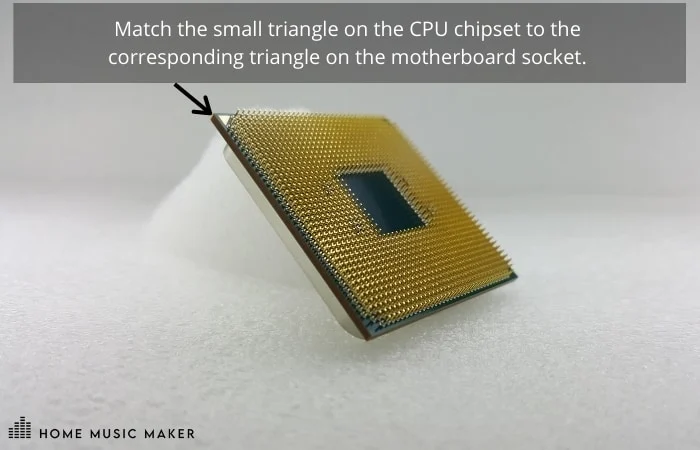
Now carefully position the CPU into the socket. It should fall into place without you having to push it at all. Take extra care not to touch the gold pins by holding the chipset on its edge using your thumb and fingers.
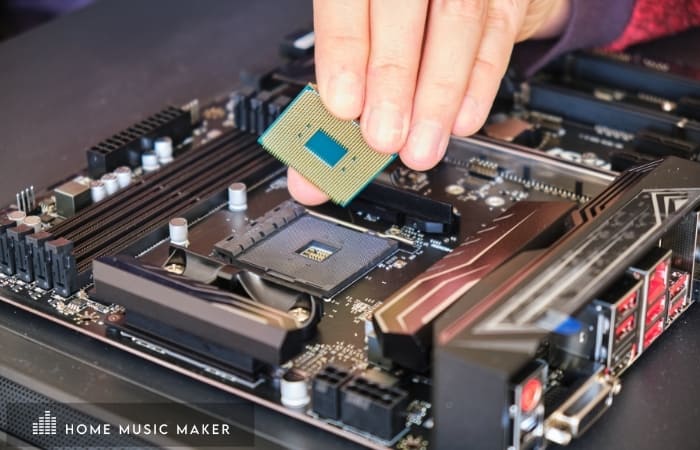

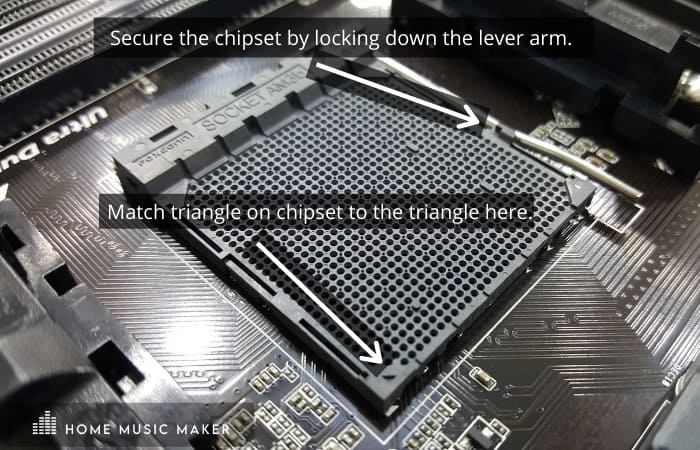

Once in place secure it with the lever arm on the motherboard.


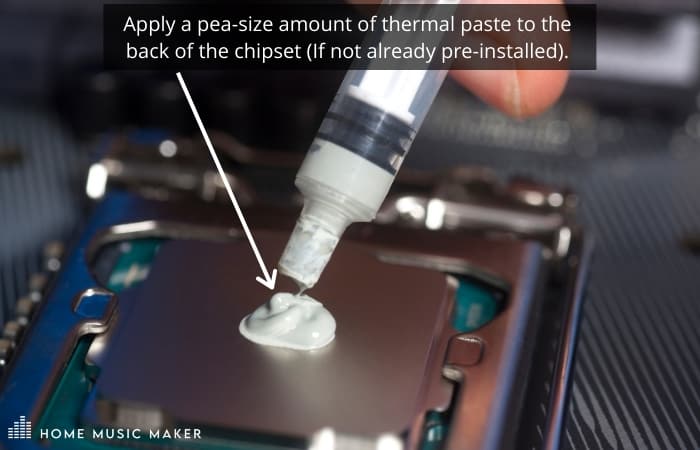
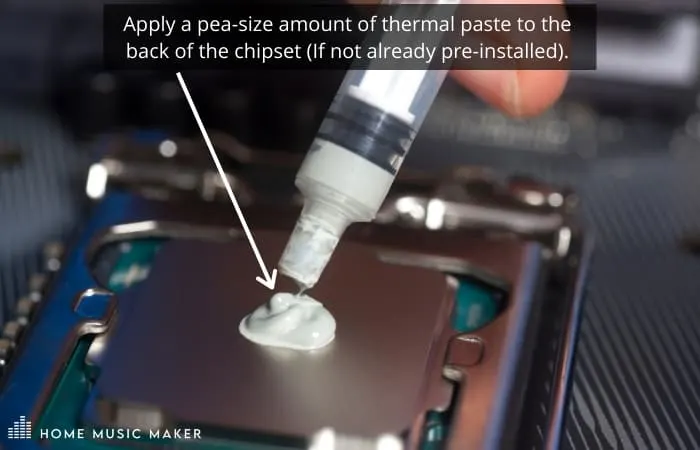
Next, it’s time to apply the thermal paste and mount the CPU cooler. How you do this will depend on what CPU you are using, so it’s best to read your instruction manual.

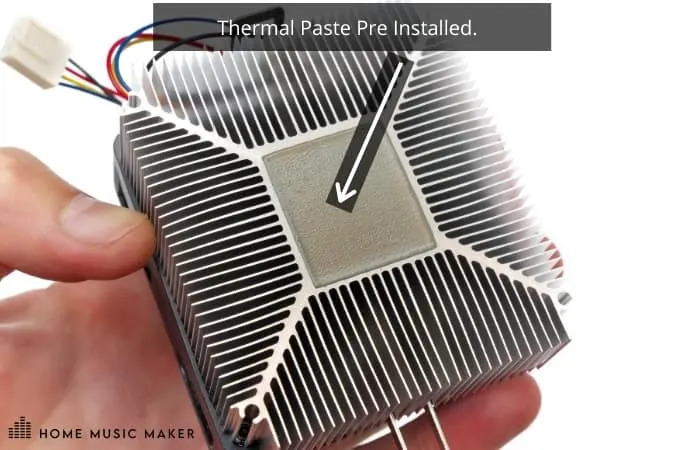
Some CPU coolers will already have the thermal paste ready to go on the bottom of the fan. If not, a good rule of thumb is to use a pea-size amount of paste.
Less is defiantly more when it comes to thermal paste!
Well done, the toughest part of the job out of the way! now onto the easiest part.
Step 3: Installing The RAM
I usually continue inserting the RAM next; however, some people leave this step until the motherboard is inside the case. RAM sticks are the only exception where you need some force to make them snap into the slots.
You’ll notice a notch cutout almost midway (this is so it can only fit one way) along the bottom of the stick. This should align with the reversed notch found on the RAM slot on the motherboard.

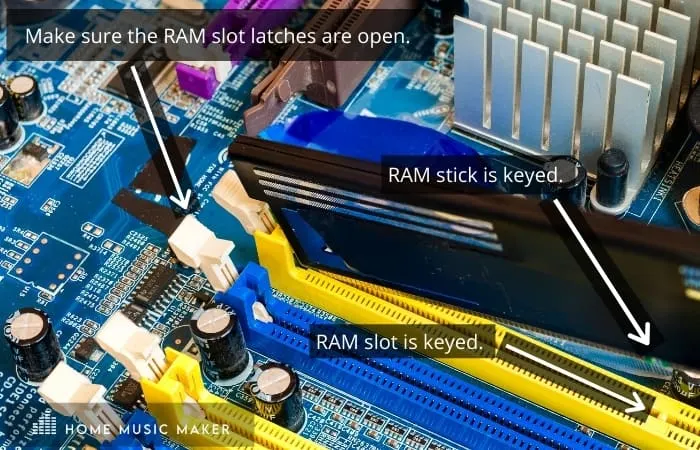
Have your motherboard secured against either the box it came in or the casing (if you’ve already installed the motherboard in the case) to prevent flex in the process of insertion.
You don’t need to push that hard anyway, but hard enough for the latches on either end of the stick to close shut with a satisfying click.
RAM sticks are pretty sturdy, and unless you push too hard, there is almost no chance of breaking or damaging them.
M.2 SSD
If you’ve gone with an M.2 SSD, now is as good a time as any to install it, as it will be tricky to get to later in the build.
Mine is located underneath a Heatsink, but yours may be different, so check out your motherboard instructions.
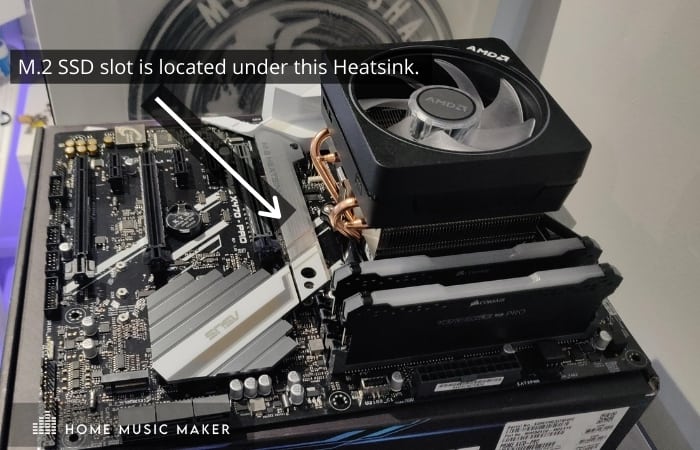
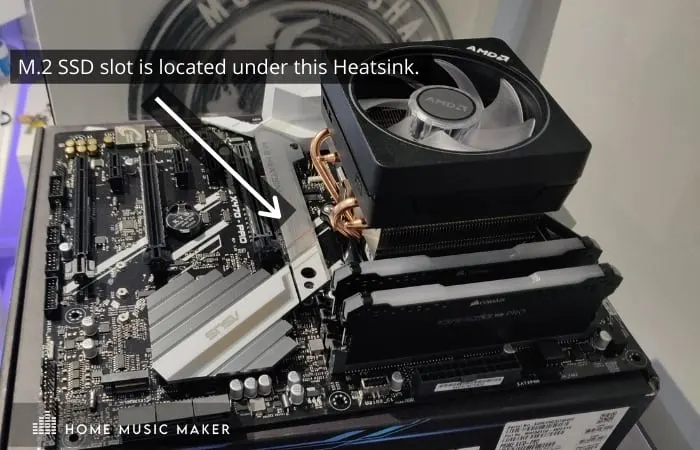
Remove the screw located at one end of the M.2 slot and slide the SSD in at an angle into the motherboard slot. This screw is tiny, so be careful with it!
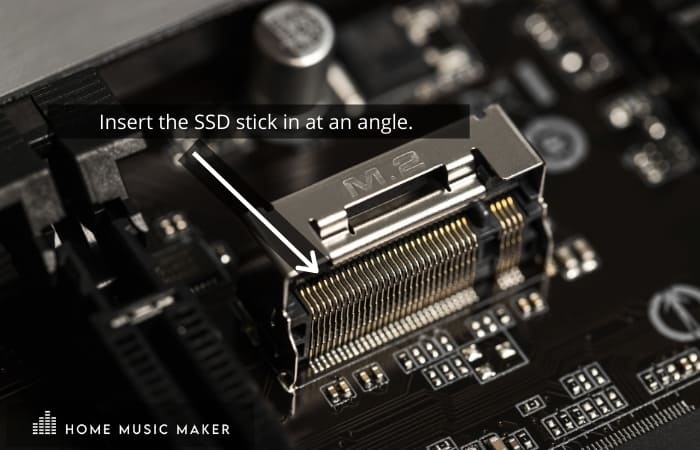
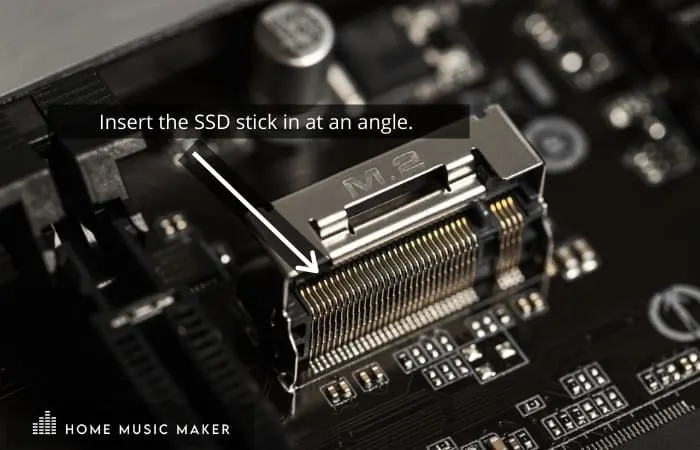
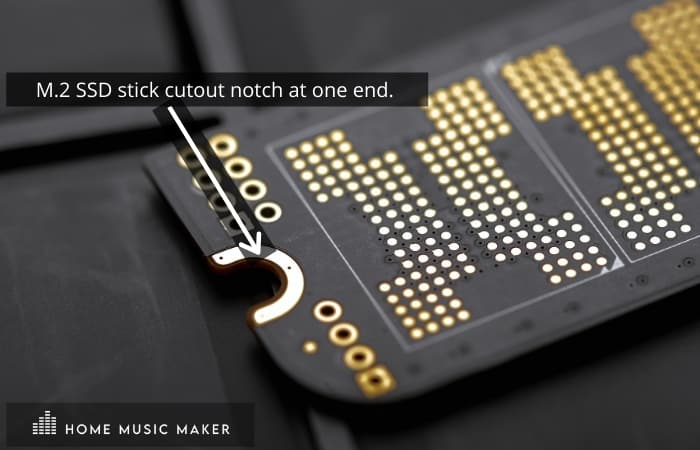
Make sure you line up the notch cut out on the SSD with the reversed notch on the M.2 slot like you did with the RAM sticks earlier on.
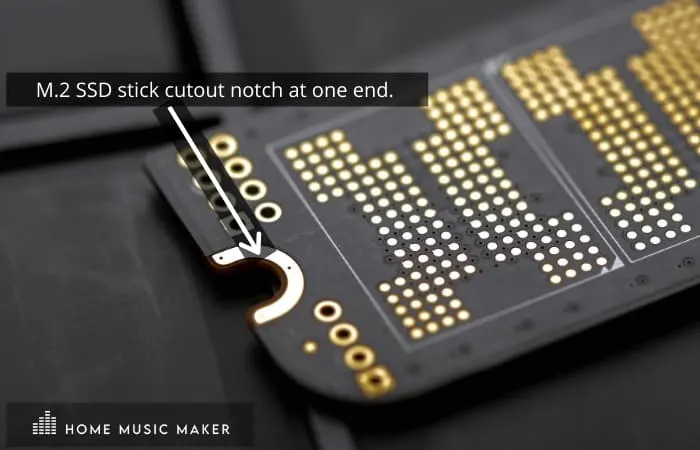
Now carefully lay the SSD stick flat and secure with the mounting screw, and replace the Heatsink if it has one.
Installing The Motherboard
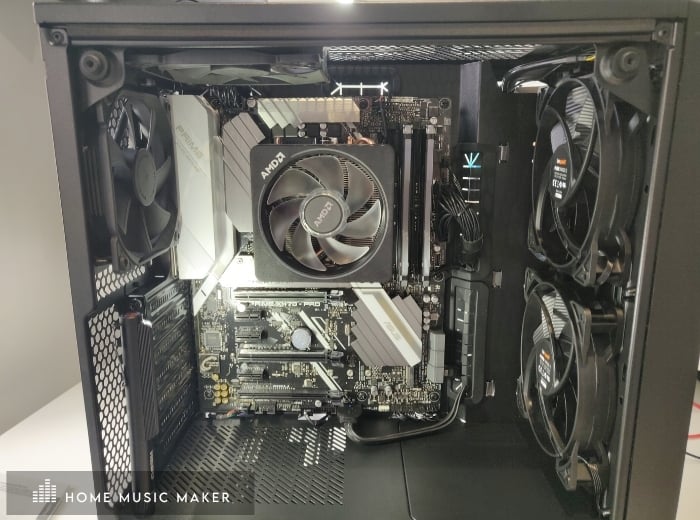
Now it’s time to mount your motherboard.
At this point, you should inspect where your best options for routing your cables and are situated.
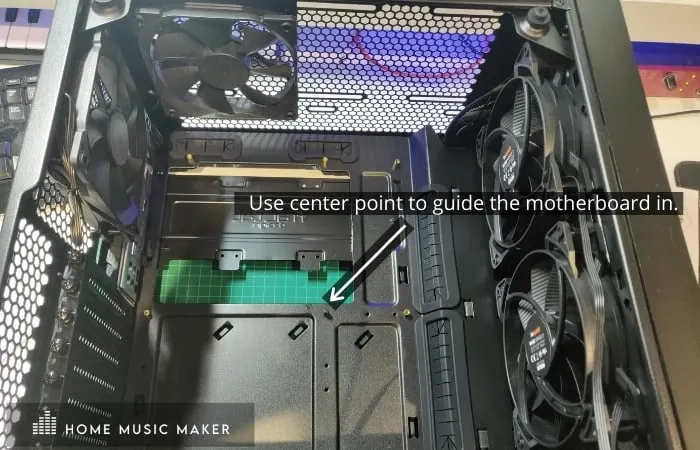
Lie the case on its side and gently lower the motherboard into the case. Ensure the holes on the motherboard line up with the standoffs and that the ports on the rear of the board line up with the cutouts on the I/O shield that you installed earlier.
Some cases have a center standoff to help you get the board into the correct position. Once you are happy, the motherboard is in position; screw it down into the standoffs with the supplied screws.

Installing The PSU
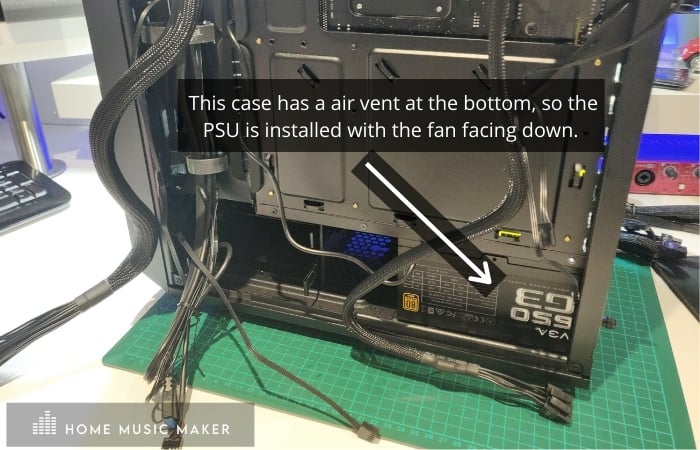
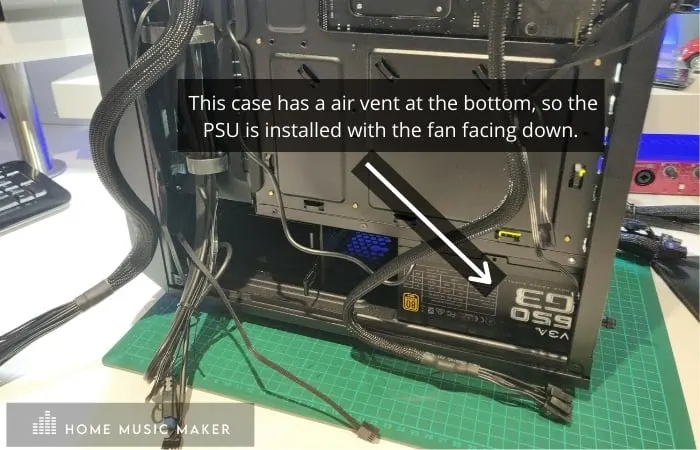
Mounting your power supply into the casing is pretty straightforward. Most PSUs will be located at the bottom rear of the case and depending on what type of case you have will determine whether the fan should be facing up or down. If your case has an air vent/filter on the underside, place the PSU fan facing down.
Once in position, screw the PSU in with the supplied 4 screws.
Some power supply units will have all their cables already in place; more expensive units will have modular cables so you can attach only the cables you need.
Additional HDD
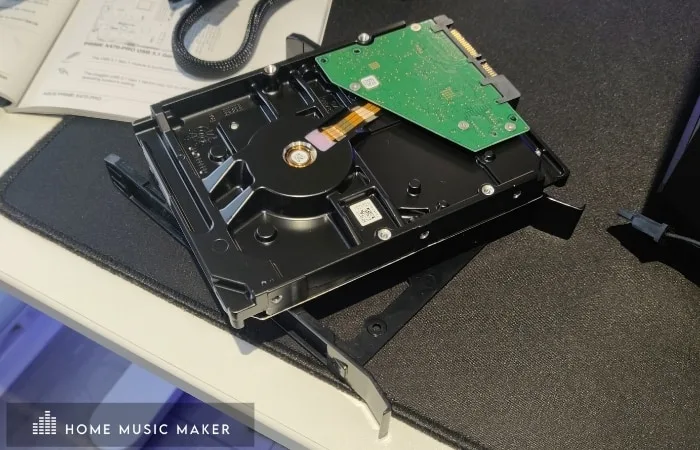
For those that have also decided to include an HDD, most cases will include a tray that holds the hard drive into place. Designs may vary slightly depending on what case you are using, so check your manual.

Connecting Cables
Now with everything except the graphics card installed, it’s time to start connecting the wires. This is probably the fiddliest part of the build, so take your time and double-check everything with your manual.
Remember, if you have a modular PSU, you can select only the cables you need.
Start by plugging the fan connectors into corresponding headers on the motherboard. If you have more fans than headers, it’s worth buying some splitter cables to run two fans off a single header.
Next, attach the front-panel audio cable, USB 2.0 and USB 3.0, HDD LED, etc., case connectors to their headers.
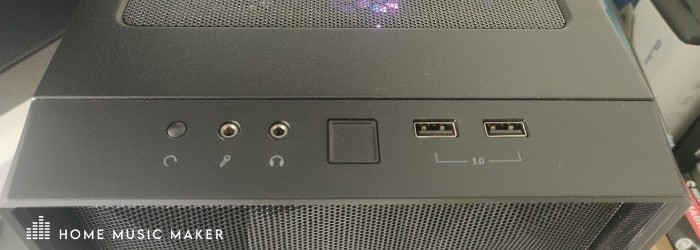
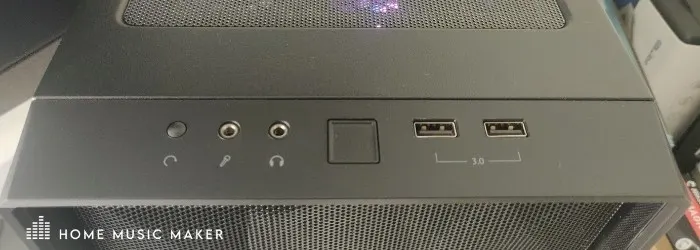
Their location varies by motherboard model, so consult your manual to find them (the reset, power, HDD LED, etc., are usually along the bottom, though).
Some of these cables are tiny and have even smaller printing on them, so take care of plugging them into the correct headers, as some of them have + and – so need to have the correct orientation.

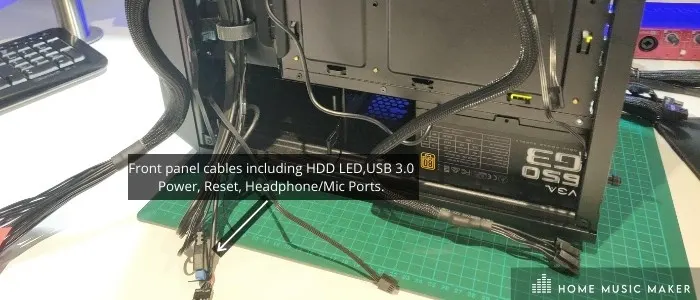
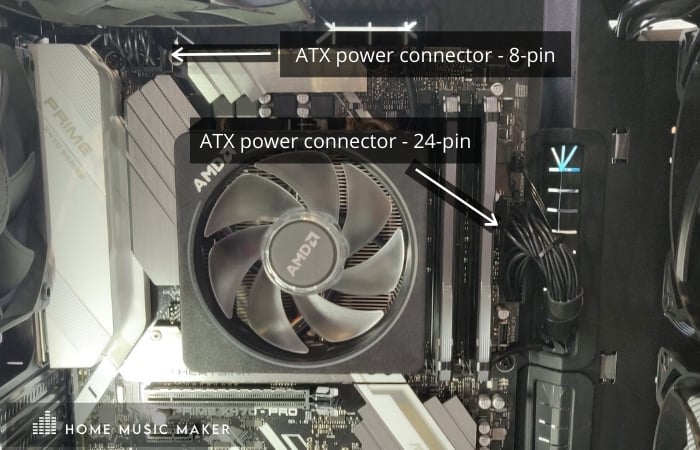
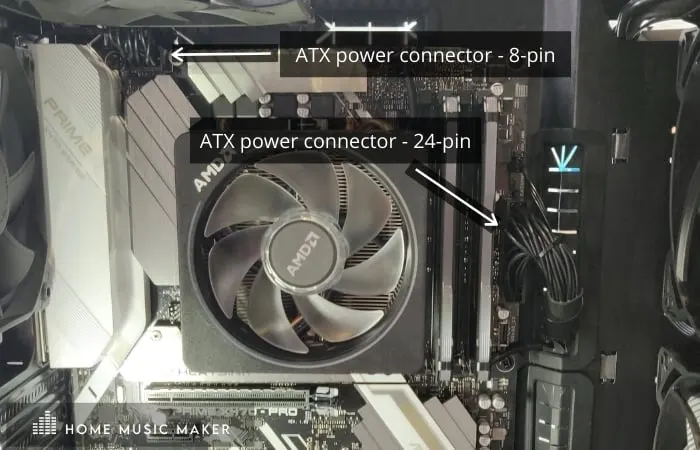
Now it’s time for the power cable from the PSU to the motherboard. Using the 24-pin ATX and EPS12V power cables into their correct slots on both the motherboard.
The hard drives are next (not the M.2 SSD connected earlier); these can be either 2.5-inch SSD or 3.5-inch hard drive connected with SATA cables. These require a little more care as they can easily get mixed up with the other cables.
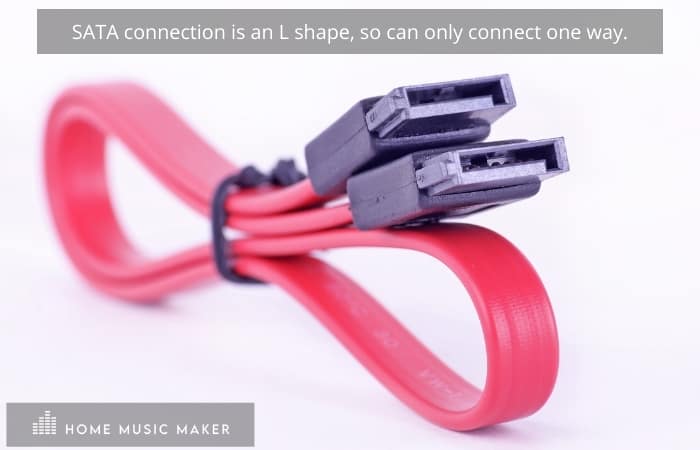

Find the slot on your motherboard that matches the SATA connector, and plug one end into it. Plugin the other end to the power supply, and you’re all set.
Finally, run the power cable for your graphics through into the case, ready for the build’s last step.
Install The Graphics Card
The Graphics card is secured in much the same way as RAM sticks, except for making sure that the monitor output properly peeks through the dedicated opening at the back of your case.
First, locate the PCIe x16 slot closest to your processor on the motherboard and remove the corresponding number of slot covers on the back of the case so that the graphics card ports show through.
Keep these plates to hand as you may need them again to secure the card in place.
Uncover the plastic covers on your card’s PCIe connector, HDMI, and display ports, as these will prevent you from installing your graphics card correctly.

Line up the graphics card over the top PCIe slot inside your case.
Ensure the display outputs are facing toward the rear of your case, then push your GPU down into the slot just like you did with the RAM earlier in the build.
Once it clicks into place, reattach the backplates you removed to hold the card firmly in place.
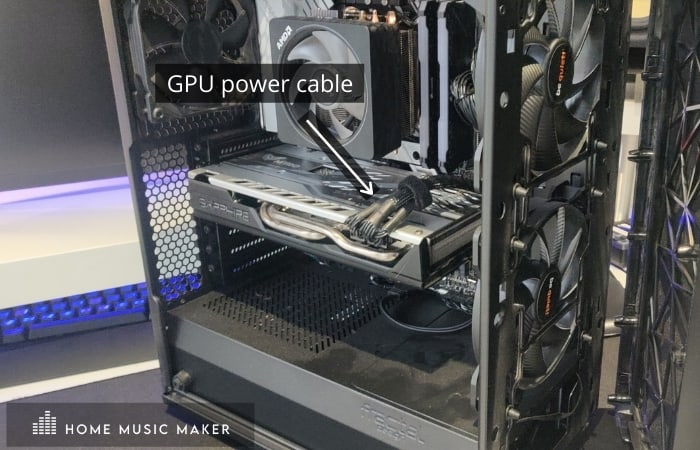
Finally, grab the GPU cable from your power supply that you threaded into your case earlier and plug it into the graphics card.
Cable Management
I know if you’ve got to this stage, you want to get on and fire it up, but seriously spend a few minutes tidying up the cables.
Not only does it make it look better, but it also makes it easier getting the back panel on, but most importantly helps with airflow.

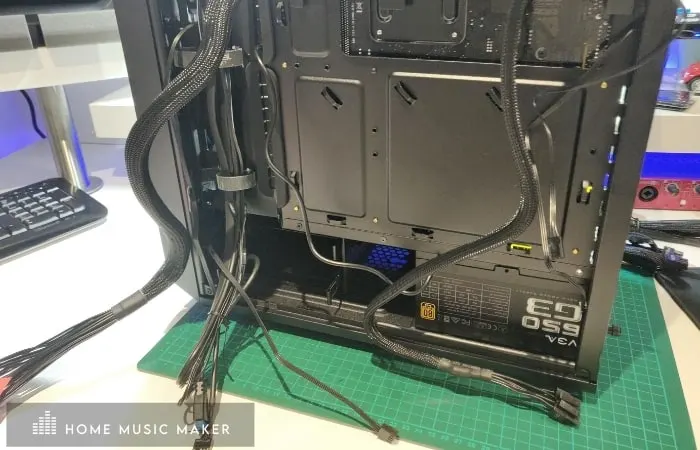
Thankfully most good quality cases have plenty of anchor points, rubberized cable holes, and hidden compartments to help get wires out of eye-shot.
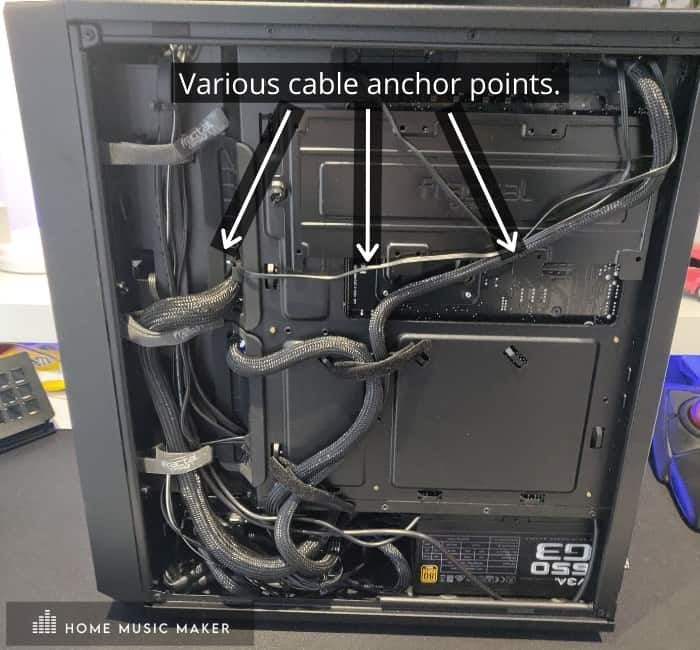
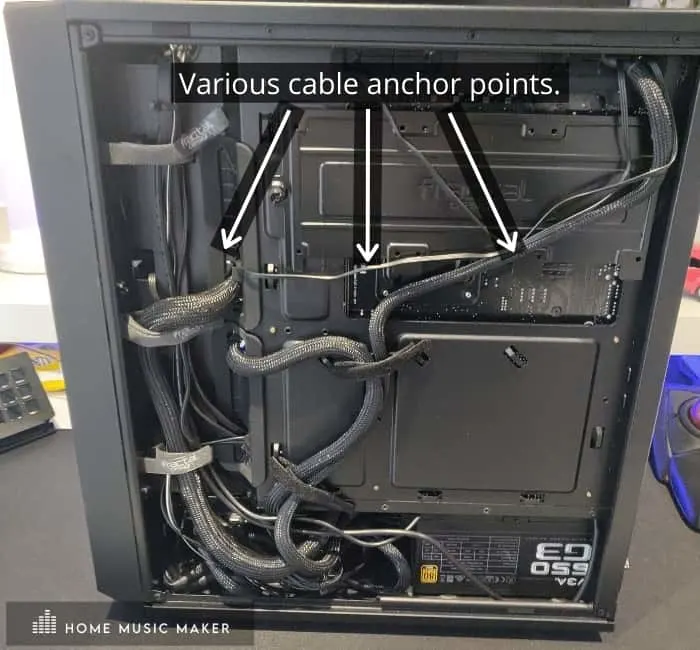
It’s often a matter of experimenting to find the best and most logical route for all your cables, running them through the nearest hole to get behind the motherboard tray. Try and group smaller cables and use the cable’s full length to avoid bunching the cables.
When you think you have sussed your cable’s route, double-check you are not covering and fans, coolers, or heatsinks before fixing them in place with your ties.
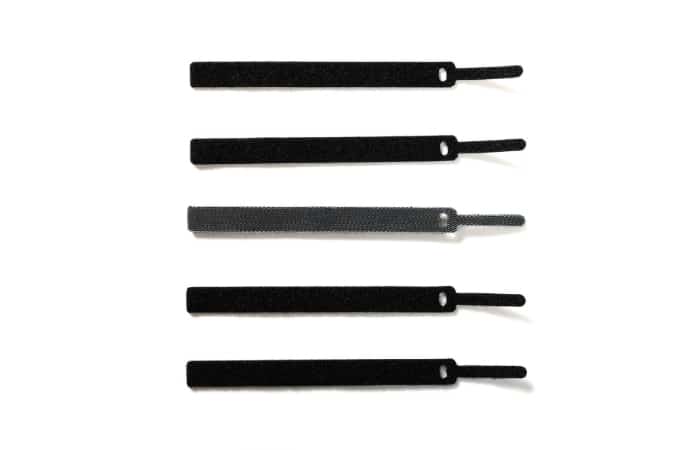

You can use cable ties, but I’d recommend velcro or twist ties, as they can easily be undone if need be.
FAQ – BUILDING A COMPUTER FOR MUSIC PRODUCTION
Should I get a laptop or desktop computer for music production?
I’d say that each has its own place depending on your needs. The biggest advantage of a laptop is definitely its mobility. You basically have a portable studio, which is great if you collaborate a lot with other producers and artists. A desktop can give you more power for a lot less money, and it’s also upgradeable.
Is RAM or CPU more important for music production?
If I had to choose between the two, I would probably opt for a better CPU. Having a lot less RAM will definitely limit my ability to multitask, but an increased rendering speed would probably make up for that.
How much storage do you need for music production?
Unless you have some over-the-top amount of space like 8TB, you’ll probably always feel like you do not have enough. If you regularly delete files you don’t use and don’t stuff your hard drive with unnecessary sample libraries, you can be just fine with 2 TB. Anything below that will require serious space management.
Is 4GB RAM enough for music production? Is 64GB RAM overkill?
It is usually stated as a minimum, and I do think that you could work with it. However, you would need some workarounds when dealing with CPU hogs. A good option is to record the VST instrument to audio, then remove the VST from the track. This will free up some memory space that way. I have never been in a situation where I feel like 16GB of RAM is holding me back. I imagine 64 GB is useful for video rendering. Still, for music production, I see no use in it, especially with the growing trend among plugin developers to decrease CPU usage even in complex plugins.
Is Windows 10 good for music production?
Ever since I’ve installed Windows 10, I’ve experienced very few bugs and crashes in my DAW even after some major updates. It seems like the system is optimized rather well.
Is a mac computer better than a PC for audio production?
The age-old question. I’ll try to give a reasonable answer and say that both systems work equally well. It’s just a matter of which interface you are used to.
Is i5 good for music production? Are 6 cores enough?
I have friends that have been happy users of i5 for many years and would highly recommend it. 6 cores seem plenty to me, but I do not rely on using massive Kontakt libraries that much. I can definitely imagine situations where 6 cores would struggle a bit.
Final Words
That pretty much sums up everything you need to know, from buying the right components to actually building your own computer for music production.
If you still feel unsure, watching a couple of YouTube tutorials should make you feel a bit more confident about doing this.
It’s also good to know that most parts are generally sturdy enough to handle them without the worry of breakage; however, being careful is still advised.
Once you have completed your build, there are still a few steps to take before you are fully up and running, like installing an operating system, drivers, and any music software you require.
Still, it won’t be long until you have a fully functional machine ready for countless hours of audio processing and recording music.